DIY Vintage-Style Spring Banner
The project I'm sharing today is so easy that I almost didn't share it. You can whip this papercraft up in ten minutes and everything you need to make this DIY vintage-style Spring banner can be found at the dollar store. But what makes this paper banner unique is its vintage-style and I'll show you how easy it is to do.
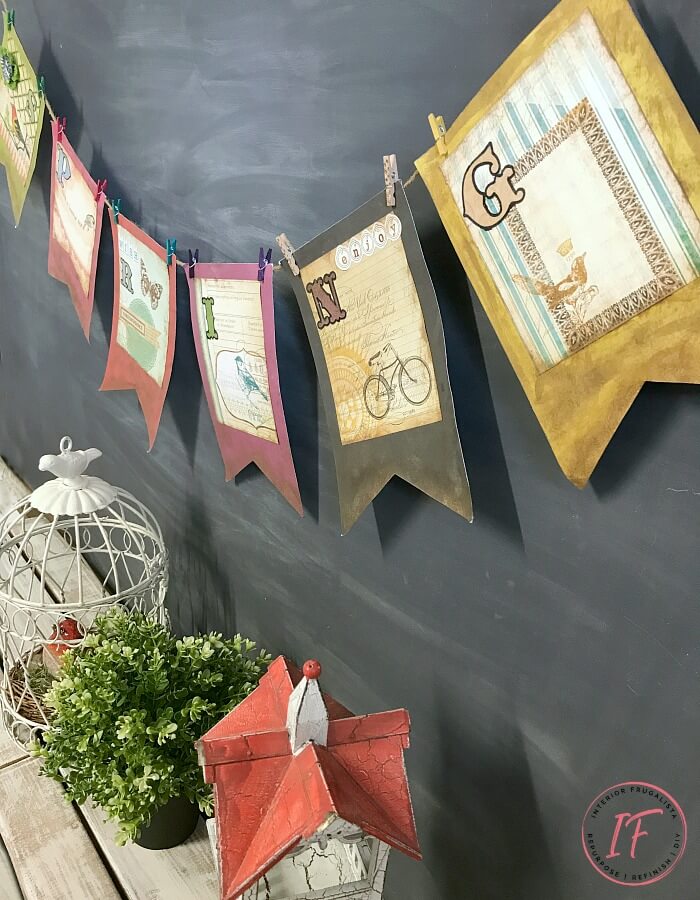
Like seasonal wreaths, bunting banners have become a popular Spring decor idea. This simple spring garland is perfect to hang on a fireplace, drape over a mirror, or hang on a chalkboard like I did. Banners are no longer just for parties!
Vintage-Style Spring Paper Garland
I originally made the garland for staging the Repurposed Silver Tray Chalkboard Signs and several readers asked about the garland. Then I used it again in my DIY Chalkboard Wall post and again I had several readers ask about the garland.
So it was about time I shared a tutorial on how I made it!
Before we get into the nitty-gritty of how to make the spring paper garland, almost all of the DIY projects shared here at Interior Frugalista have step-by-step tutorials so why not get your budget DIY on and subscribe. You can also follow us on Pinterest, Facebook, Instagram, and YouTube.
Here's What You'll Need To Make It
These are the items I used to make the spring banner. You may not find exactly the same items I found at my local dollar store but look for similar items that will work. I also included a supply list with links to alternative supplies further down in the post.
Each bunting flag is made with colored cardstock and scrapbook paper.
Alphabet stickers spell the word SPRING across the bunting flags.
Some flags are embellished with individual stickers like these cute tag stickers that spell the word WISH. They compliment the butterfly which symbolizes hope, change, and new beginnings - fitting for Spring.
I looked for scrapbook paper with images that reflect the season like the cute chickadee on the one below.
Here some cute round tag stickers that spell the word ENJOY complimenting the bike and the paths it will take the rider on this Spring.
You'll notice several of the flags have bird motifs for Spring like on the striped vintage-style paper below.
But my favorite embellishment is the adorable crochet bottle cap that I added to the first bunting flag.
How To Make A Vintage-style Spring Banner
Okay, now that I've given you a close-up of each bunting flag let me show you how easy it is to make them.
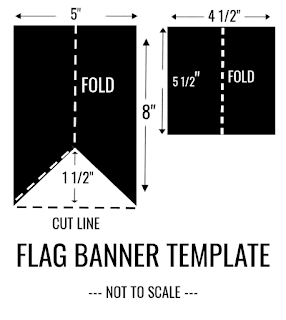
Starting with a template for both the cardstock flags and scrapbook paper overlays.
- The graphic above illustrates how I made templates for both the banner flags and flag overlays. I would suggest making them with either cardstock or thin cardboard. Cut the templates with a paper cutter or scissors.
- Trace the flag template onto color cardstock and cut them with a paper cutter.
- Use the second template to trace the flag overlays onto scrapbook paper and cut with a paper cutter.
- Glue the scrapbook paper overlays onto the color cardstock flags with white school glue, Mod Podge, or a glue stick.
- Embellish the banners with whatever you have on hand or can find at the dollar store. I used word sticker booklets I found at the dollar store.
- I also embellished the first flag with adorable crochet wrapped bottle cap that came in a package of three from the dollar store.
- Spell the word S P R I N G with colorful alphabet stickers across the banner. You may want to dab a little glue behind the stickers for extra adhesion.
How Age The Paper Spring Banner
This is what the bunting banner looks like before giving it a vintage-style patina.
This next step takes the scrapbook paper banner from looking like a brand new craft to one that looks like it was made many years ago. Wouldn't you agree that it has a lot more character and charm now?
To age the scrapbook paper you simply pounce acrylic craft paint in the color Burnt Umber with either a small damp seafoam sponge, scrunched lint-free rag, or small stencil brush. Alternatively, you could use dark wax to age the paper also.
Much like stenciling, offload the excess paint (or wax) onto a paper towel and pounce in an up and down motion over the color cardstock paper. Add more paint along the edges where the paper would naturally age over time and overlap some of the paint along the edge of the pretty scrapbook paper too.
How To Hang The Spring Banner
Cut a long strand of twine the length of the item you'll be hanging it on plus 24-inches, so you have a 12-inch tail on each end. This way if you plan on hanging the banner elsewhere the following year, you'll have excess twine should you need it. Attach the bunting flags onto the twine with mini clothespins and that's it, you're done!
I told you it was easy peasy! 😀
As promised here is the supply list and it contains affiliate links so you can see what alternative product recommendations for this project. As an Amazon Associate, I earn a small commission from qualifying purchases at no extra cost to you.
Supply List
- Color Cardstock Paper
- Spring Scrapbook Paper
- Alphabet Stickers
- Word Stickers
- Crochet Wrapped Bottle Caps
- Mini Clothespins
- Natural Twine
- White School Glue, Mod Podge, or Glue Stick
- Burnt Umber Acrylic Craft Paint
- Small Sponge or Stencil Brush
- Scrapbooking Paper Cutter
I've made many DIY garlands and banners over the years like this Vintage-Style Valentine Garland. Here are a couple of mini wedding garland ideas like this Rustic Wedding Card Box Banner and this Beach Wedding Card Box Banner
For more DIY Spring inspiration visit our DIY Spring Ideas Page.
Thanks for stopping by the Interior Frugalista today! I hope you were inspired by this vintage-style spring banner DIY. If you have any questions, please leave them in the comment section below or the Contact Me tab at the top to drop me an email. I love hearing from you!
If you enjoyed this Spring banner idea, I'd be so thankful if you shared it with a friend and pinned it to your Spring Craft Ideas or DIY Spring Decor ideas board on Pinterest.

I share my projects at these inspiring link parties.


This is so pretty! Such lovely finds at the dollar store. Have a wonderful day!
ReplyDeleteTamara X
Thank you so much Tamara! I love frequenting our local Dollarama stores, especially the craft aisle. I have bins of craft supplies from my shopping jaunts.
DeleteThose little crocheted caps are ahhh-dorable Marie! Such a sweet idea and I love the vintage vibe! Hope your snow melts ...like right now...lol... and you have super day. XO
ReplyDeleteI know, right! I wish I had grabbed a bunch of those bottle caps to keep in my stash. It's snowing again today! Wishing you a super day as well, Denise. xo
DeleteI'm always focused on one thing when I go to the dollar store, or I come home with everything---I will have to look for makings for something like this---I love the aging. Interesting we make old look new, and new look old...a conundrum of sorts. LOL. Great job!
ReplyDeleteHow do you do it, Sandi? It is impossible for me to go into the dollar store with just one focus. I see shiny things almost the second I enter and then more and more. Some things are one time products so I can't miss the opportunity. LOL
DeleteHi Marie! This is darling! So spring-like. I love the vintage style of the banner flags. Didn't I see snow in one of your recent posts on social media? I think you need to come down to the beach! LOL!! Take care my friend! Oh, and I pinned this darling banner too!
ReplyDeleteHi Wendi, so good to see you here my friend 😀 I needed some Spring in this house because old man winter doesn't seem to want to leave. Thankfully that nasty snow has since melted and they are forecasting warmer temperatures this week. Some hot sun and a beach sounds soooooo good about now!
DeleteI totally agree with you Marie, you do need to share more of your bunting crafts. It's sometime difficult to tell just looking at a photo how someone achieved the finished look. And this one is a perfect example of that. Love how you used to burnt umber to age the paper. That's such a great idea. I always have a tube of that in my painting supplies, but trying to find inks isn't so easy
ReplyDeleteThanks Michelle! This is one of the largest buntings I've made. Normally I make them around 2-inches wide. Time to make a Summer one for the kitchen chalkboard because I do have faith that Old Man Winter will eventually get the message that it's time to blow this popsicle stand!
ReplyDeleteOh, this is so pretty... love the vintage look! Hey, nice new profile photo! I would have never guessed it was you! Lovely!
ReplyDeleteThanks Julie, glad you like the banner AND the photo! The old headshot was about two years old and I've since gone short with my hair and stopped coloring it red so figured it was time for a new mug shot. LOL
Delete