Dollhouse Diamond Shag Rug and Chunky Knit Blanket
Time for another dollhouse update and this time we're making DIY dollhouse accessories with yarn. Based on the trendy life-size versions, I'm sharing how to make a miniature diamond shag rug AND a cozy miniature chunky knit blanket for a dollhouse.
Both are for the repurposed IKEA Billy Bookcase dollhouse we plan on gifting our granddaughter. I'm also sharing instructions on how to knit with a crochet hook along with other helpful tips for making both yard dollhouse accessories.
Miniature Diamond Shag Rug and Chunky Knit Blanket
Everything, including the dollhouse, is made with repurposed finds or a DIY project. One of those DIYs is a realistic dollhouse fireplace with a flickering flame. You can follow the dollhouse series here on our dollhouse page.
We'll begin with the cozy miniature chunky knit throw. At first glance, you would assume the blanket is a handmade knit blanket but I can't knit to save my life. Many have tried to teach me unsuccessfully over the years but if you put a crochet hook in my hand, well that's another story.
So when I decided to make a dollhouse chunky knit blanket, I had to either learn how to knit once and for all or figure out a way to get the look with a crochet hook.
Have you heard of the Tunisian crochet stitch? I sure didn't until doing some research online and now I'm hooked (sorry, couldn't resist the pun).
Here's Barbie relaxing with a cup of coffee under her snuggly chunky knit...ahem...crochet blanket throw. The miniature fiddle leaf fig plant beside her is also handmade for the dollhouse.
What You'll Need To Make It
This post contains affiliate links so you can see what products I used or recommend for this project. As an Amazon Associate, I earn a small commission from qualifying purchases at no extra cost to you.
Supply List
- 1 skein white chunky blanket yarn
- 8.0 mm Tunisian crochet hook
How To Crochet A Miniature Chunky Knit Throw
I used a white chunky blanket yarn in a 50:50 wool/acrylic blend with an 8.0 mm Tunisian crochet hook. You don't want to use anything smaller than 8.0 mm to get the chunky knit.
I made the blanket to a 1:1 Scale (8" x 9") based on a full-size blanket which is 80" x 90".
Tunisian Knit Crochet Stitch Instructions
- Unlike regular crochet, you NEVER turn your work.
- Always have 20 loops on your hook for the blanket.
Row 1
- Slip stitch yarn onto the hook and chain 20.
- The last loop on the hook is the first stitch of row 1.
- Go through the front ONLY on the second loop - yarn over and through. This is your first stitch.
- You'll have two loops on the hook.
- Through the front only on the third stitch - yarn over and through. Now you'll have three loops on the hook.
- Continue until 20 loops are on the hook
Row 2
- Yarn over into the first loop.
- Yarn over into two loops. You will be dropping one stitch.
- Yarn over into two loops - again dropping another stitch.
- Repeat until one loop remains on the hook
Row 3
- Go behind the second long stitch from the hook - through the gap behind the stitch - yarn over and through. Now you'll have two loops on the hook.
- Go behind the second long stitch from the hook - through the gap behind the stitch - yarn over and through. Now you'll have three loops on the hook.
- Repeat the previous stitch until you reach the last stitch on the hook.
- Go through the last stitch from the previous row (it isn't a long stitch like the others) - yarn over and through. Now 20 loops should be on the hook.
Row 4
- Repeat Rows 2 and 3 until the blanket is nine inches long. You want to end on the row 2 pattern with just 1 loop remaining on the hook.
- Tie off and thread the strand of yarn with a needle through the blanket.
If you are more of a visual learner, I found this Tunisian Knit Stitch video that you may find helpful. It sure helped me!
I promise, once you get the hang of it, it is such an easy crochet pattern. It's been a long time since I picked up the crochet hooks so if I could do it you definitely can!
Now let's move onto project two, the miniature diamond shag area rug for the dollhouse.
Dollhouse Diamond Shag Area Rug
In my 20s I was a hooker (figured that would get your attention) 🤣 of the latch hook rug variety. In search of ways to get inexpensive art for my apartment, I discovered rug hooking. It was great fun.
I never got rid of my rug hooking tools and decided to put them to good use again by making this miniature rug. Grey and white diamond shag rugs are so on-trend these days and I figured why not make a miniature version for the dollhouse.
The large rugs I used to make were made in what's called a latch hook design with a latch hook canvas and wooden latch hook. So I set out to use those same tools for my miniature latch hook rug.
In total transparency, I figured I'd have this miniature rug whipped up in an hour - boy was I wrong!
The wooden latch hook did not fit through the tiny rigid grids on the plastic canvas. I tried pulling the yarn through with a small crochet hook instead but that didn't work either.
Onto plan B - using what I had on hand. A large-eyed blunt needle, a new Netflix series loaded and ready to watch, and a whole lot of patience.
What I'd Do Differently
Alternatively, if you use a flexible fabric latch hook canvas, the wooden latch hook should easily fit through the tiny grids on the canvas. With this alternative, you'd have this rug finished lickety-split.
What You'll Need To Make It
Supply List
- 1 skein white acrylic yarn
- 1 skein of dark grey acrylic yarn
Option 1 Supplies (my version)
Option 2 Supplies (recommended version)
- Flexible Latch Hook Canvas
- Latch Hook Tool
- Yarn Cutter (homemade)
- Scissors
- Black Marker
- Quilting Ruler
How To Make A Dollhouse Diamond Shag Rug
Like the miniature chunky knit blanket, I made the miniature area rug on a 1:1 scale (8" x 10") based on a full-size 8 x 10' area rug.
Mapping The Diamonds On The Canvas
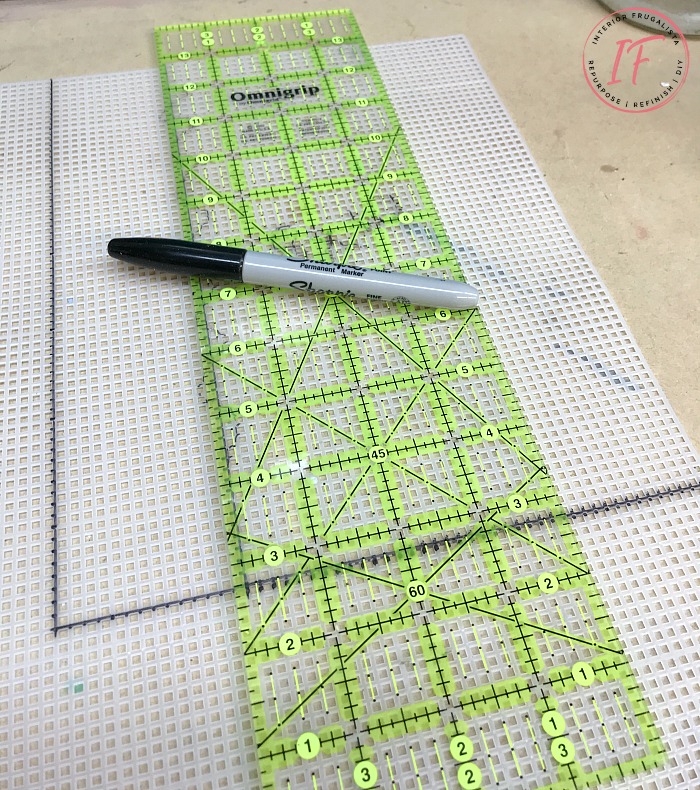
With the quilting ruler, measure the canvas 8 x 10 inches and cut it to size with sharp scissors.
Use the 45-degree angle on the quilter's ruler as your guide to map out even squares on a diagonal across the canvas (as pictured below).
Cutting The Yarn
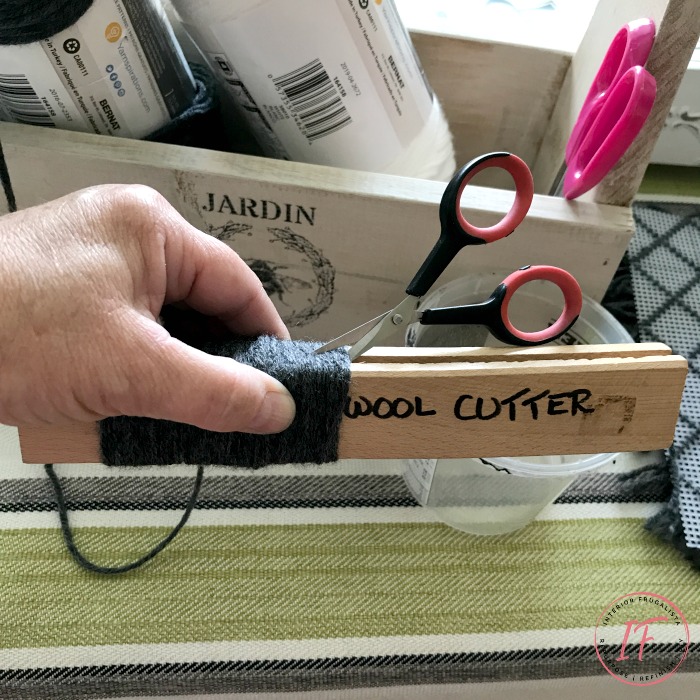
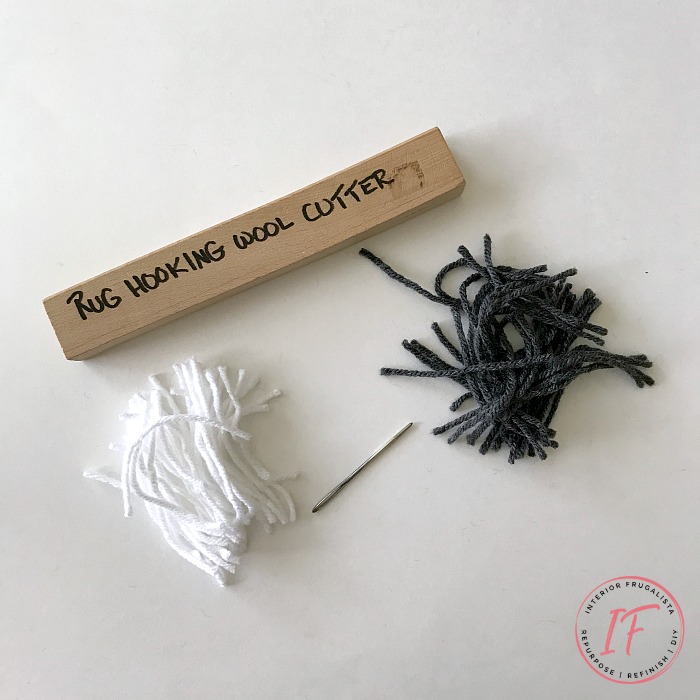
It's been so long I can't remember if I purchased my yarn cutting tool or if Mr. Frugalista made it. Alternatively, a piece of cardboard would work too.
I cut the yarn into 4-inch strands (long enough to pull the thread through). If it's easier for looping you could cut it 5-inches long and give your rug a haircut later. I found the less you have to trim, the easier.
Hooking Yarn Onto Canvas
Now, this is where you can do the quicker version with a latch hook and flexible canvas or the slow and steady version like I did with a large stitching needle and plastic canvas. The choice is yours...go for the first option 😉.
If you've never used a latch hook before I found this helpful video tutorial
Latch Rug Hooking With Stitching Needle
Work about five rows at a time, following the grid for placement. I found it easier to hook the grey yarn on the grid marks first and then fill in the diamonds with the white yarn. Be sure to check the backside of the canvas as you work to make sure you are staying within the grid.
Thread a strip of yarn through the eye of the needle. Pull the thread through from the top of the canvas and over the grid and back through to the top again. Tie the thread with a simple knot. Considering kids will be playing with this rug, I tied a double knot to secure the yarn.
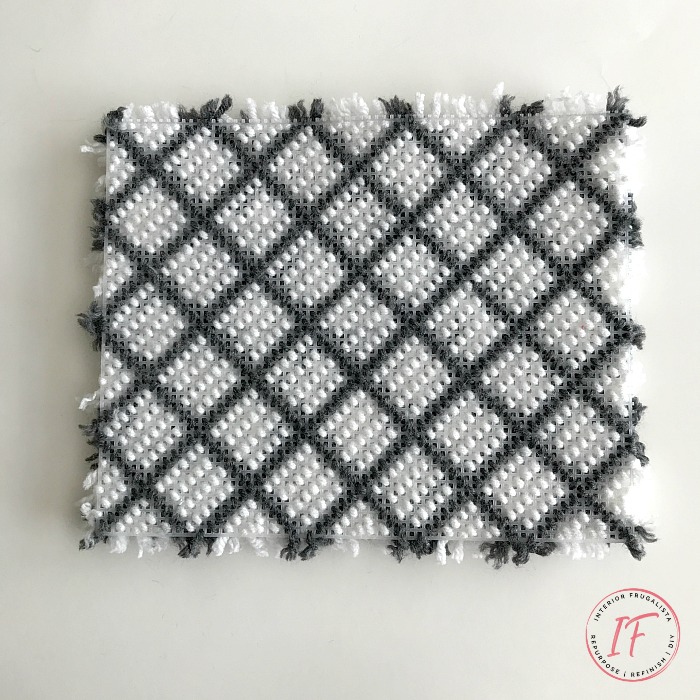
Pictured below is the backside of the rug after it was finished. You don't have to hook the yarn in the same direction I did. It is more important that you fill the grid with white yarn.
Don't fret if you can't see the diamond pattern on the front side right away, it will become more obvious when you complete the next step.
Give The Shag A Hair Cut
My rug has a 1-inch pile but the choice is yours how long you want the shag. The rug will need a haircut with sharp scissors and you have three options for doing this step.
- Trim each strand of yarn as you attach them.
- Trim the yarn after every 5-6 rows.
- Give the entire rug a haircut after it's finished.
Pro-Tip
I used option three to trim my rug and wished I had trimmed each strand as I worked. It may be more tedious but much easier in the long run. Trying to trim the rug evenly after it's finished can be challenging.
That's it, enjoy your adorable miniature version of the popular black and white diamond shag area rugs for your dollhouse.
Almost all of our DIY ideas have step-by-step tutorials so why not get your budget DIY on and subscribe. You can also find us on Pinterest, Facebook, Instagram, and YouTube.
Thanks for stopping by the Interior Frugalista today! I hope you were inspired by these wool DIY dollhouse accessory ideas.
If you have any questions, please leave them in the comment section below or the Contact Me tab at the top to drop me an email. I love hearing from you!
If you enjoyed the dollhouse diamond shag rug idea or the miniature chunky knit throw idea, I'd be so thankful if you shared it with a friend and pinned it to your DIY Dollhouse Accessories or Dollhouse Miniatures board on Pinterest.
I share my projects at these inspiring link parties.


Barbie does look terribly cozy in her beautiful home Marie, it's coming along so nicely. I bet you're having so much fun with the dolls house too. Have the grand babies seen it yet?
ReplyDeleteThe area rug was the project I had planned to share for the July IBC wool challenge and didn't get finished on time. LOL My grandson discovered the dollhouse in the workshop one day when getting batteries with grandpa for one of his toys. He plopped himself down on the floor and was lost for an hour. Then he asked if the dollhouse could be for two kiddos. Then he said, "Grandma you need to make Barbie some furniture and food. That kid cracks me up!
DeleteI think its great how your grandson suggested you MAKE Barbie some furniture and food. Your obviously a role model for teaching him to create instead of buy buy buy all the time. I have an American girl doll Pin board for grand daughter inspiration. These Barbie projects are getting added to it. Love it Marie.
ReplyDeleteYou know, Leanna, I hadn't thought of it that way when he asked but good point! Thank you so much for adding my dollhouse projects to your American girl doll board - I really appreciate it! xo
DeleteThese are adorable!!!
ReplyDeleteThank you very much Kristin, I'm glad you like them! I'm having too much fun with my granddaughter's dollhouse. LOL
DeleteMarie this is so cute! Barbie looks all nice and snuggly! I have been itching lately to learn how to knit. I see a great big throw in my future. If only I can find the time.
ReplyDeleteI hope you have a lot more success than I did trying to learn how to knit. If all else fails, do what I did and learn the Tunisian crochet knit stitch and no one will no it's not knit. 😉
Delete