Easy Yardstick Growth Chart Gift Idea
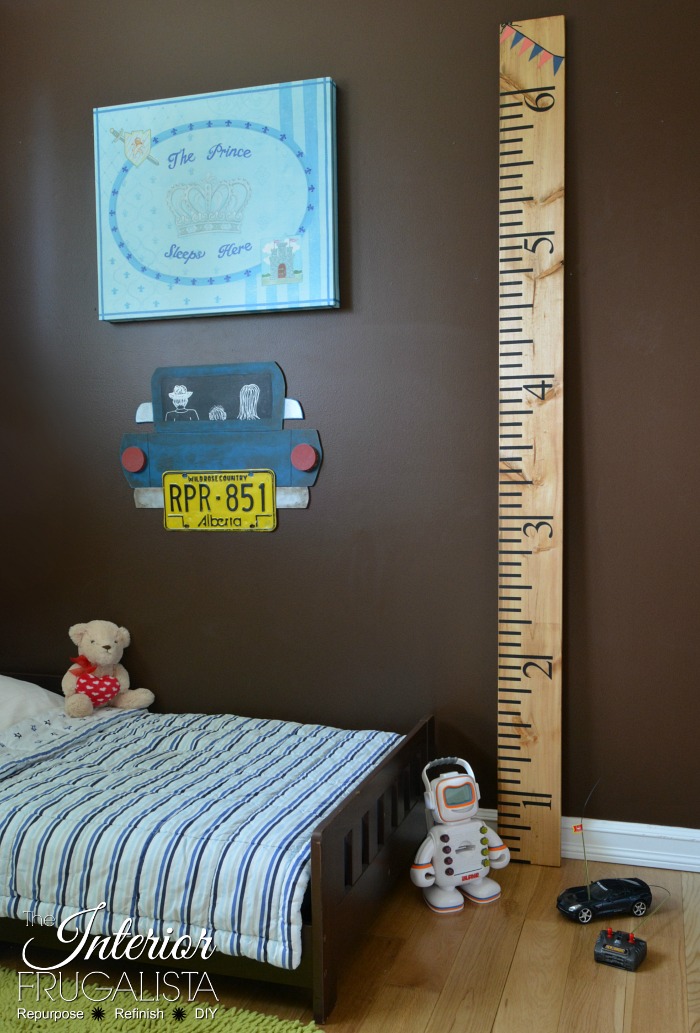
This is a great handmade gift idea for grandparents to give to their grandkids for Christmas, their first birthday, or a baby shower. These easy yardstick growth charts are a personalized handmade gift they'll cherish their entire lives, especially if you write a special message to the child on the back.
Gone are the days of standing against a wall to measure a child's growth. Sadly, many of us have moved from homes only to leave those fond childhood markers behind. With these adorable oversized yardsticks, they can take it with them!
Fun Oversized Yardstick Children's Growth Chart Idea
Every time I make these for gifts, I receive calls from family and friends of the recipient asking if I could make one for them too.
In the past, I measured and handpainted the yardstick units like how I made this DIY yardstick growth chart. But recently I discovered there's a handy stencil for that and wow, what a difference in how much quicker and easier they are to make!
What You'll Need To Make A Growth Chart
This post contains affiliate links so you can see what products I used or recommend for this project. As an Amazon Associate, I earn a small commission from any qualifying purchases at no extra cost to you. Thank you for your support!
Supply List
Unfinished 6-foot fence board
Growth Chart Stencil
Golden Oak Wood Stain
Foam Brush
Black Acrylic Craft Paint
4-inch foam roller
Painter's Tape
Baby Wipes (cleaning stencil)
Tack Cloth
Clear Coat
How To Hang The Yardstick Growth Chart
Before we get into the tutorial, the growth chart should be hung securely on the wall, especially if it will be hanging in a child's room.
If you use a sawtooth hanger, it isn't secured on the bottom and can sway or fall off the wall onto the little one's head. My preference is to use Heavy Duty Command Strips both on the top and bottom.
Also, the growth chart should be hung on the wall 6-inches above the floor because the ruler begins at the 1/2-inch mark.
How To Make A Children's Yardstick Growth Chart
Prep Growth Chart Fence Board
Lightly sand the fence board with 150-grit sandpaper or a palm or mouse sander with the grain of the wood.
Remove any splinters and roughness and soften the edges and corners of the board. Wipe it with a damp cloth followed by a tack cloth to remove any fine dust particles.
Stain Growth Chart Fence Board
My go-to stain color for the fence boards is golden oak because it resembles the color of a vintage wooden yardstick.
This is kind of funny because my least favorite stain color is golden oak. We've spent countless hours removing that stain color in our budget-friendly kitchen makeover and dining room table makeover.
Measure The Growth Chart Fence Board
Measure six inches from the bottom of the fence board and draw a light pencil line with a square. This will be where you'll line up the stencil at the 1-inch mark. Remember, it will be hung on the wall six inches from the floor.
Stenciling The Growth Chart
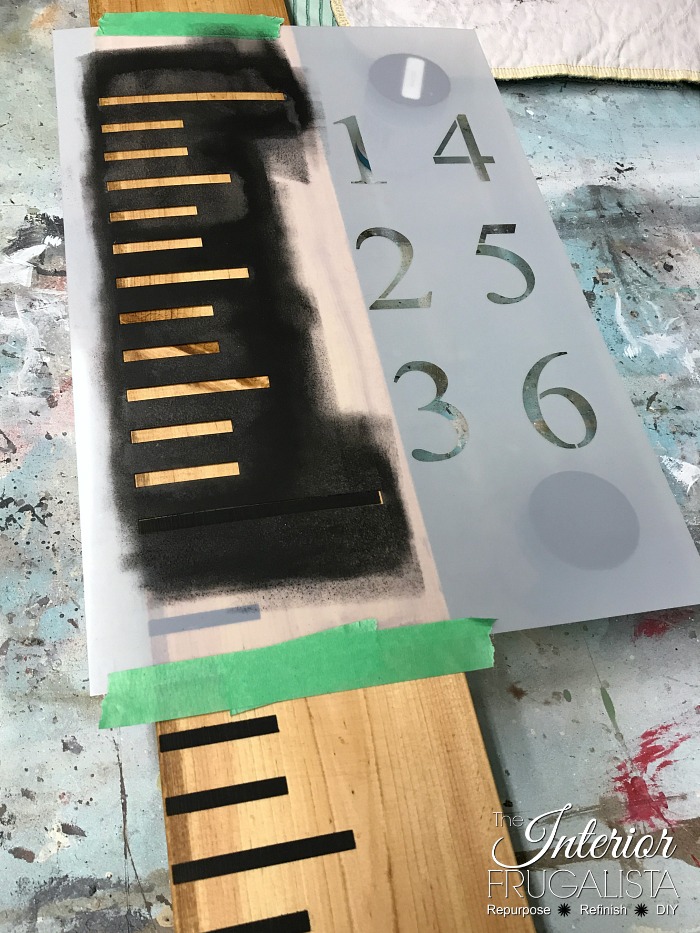
Now the fun part, stenciling the measurement units onto the fence board. Pictured below is the handy growth chart stencil I used. Here is an alternative 7-foot growth chart stencil.
Align the first 1-inch unit marker on the pencil line that you made in the previous step. Tape the stencil onto the stained fence board with painter's tape.
Stenciling Tips
- The key to not getting stencil bleed is to have very little paint on the brush. Offload the excess paint onto a paper towel first.
- Start in the open area of the stencil and work towards the edges, this way you'll offload the excess paint in the middle rather than along the edges.
- Before doing a stencil repeat, clean the back of the stencil with a baby wipe to avoid getting any seeping paint onto the front of the growth chart.
Pour black acrylic craft paint or chalk paint onto a paper plate. Roll a 4-inch foam roller into the paint and offload the excess onto a paper towel. Try not to press firmly on the roller to eliminate any stencil bleed.
If you're nervous about using a roller, then by all means use a stencil brush and bounce the paint on instead. Start pouncing in the open areas of the stencil and work your way towards the edges.
Another Stencil Tip
Notice in the photo below that I have two sample jars of paint under the stencil? This holds the stencil flat to help eliminate paint bleed.
Work your way up to the top until you've reached the six-foot mark.
This step is completely optional, either leave the bottom six inches of the growth chart blank or go back and stencil the six-inch markers like I did (pictured below).
Stenciling The Numbers
Once the unit measurements are dry go back and stencil each unit number just below the inch markers like pictured below.
Personalizing The Growth Chart
I always personalize each growth chart with the child's name. This one is going to be for our granddaughter who is due to enter the world any day now!
I've been sworn to secrecy not to disclose her name. So for now, I painted a cute bunting banner at the top of the growth chart in her nursery colors and will add the letters after she's born.
Search for a banner graphic online, I found mine at PicMonkey and saved it on my computer. Next, print the banner to fit the width of the growth chart and use this image transfer technique to transfer the banner onto the top of the growth chart.
With a small art brush and acrylic craft paint go over the transferred graphic. To add the child's name you can freehand it with an oil-based Sharpie paint pen, use a small letter stencil, or add self-adhesive stickers.
Protecting The Growth Chart
Once the paint or paint pen is completely dry, apply one or two coats of a clear protective clear coat with a foam brush or my preference is these car detailing sponges.
The most challenging part of making the growth chart is waiting for the paint and clear coat to dry. It takes between 15-30 minutes in total, besides the drying time, to make these growth charts.
I hope the parents of the little ones in your life will be thrilled with the handmade growth chart you've gifted their children. Thanks for stopping by the Interior Frugalista today!
Almost all of our DIY ideas have step-by-step tutorials so why not get your budget DIY on and subscribe. You can also find us on Pinterest, Facebook, Instagram, and YouTube.
If you have any questions, please leave them in the comment section below or the Contact Me tab at the top to drop me an email. I love hearing from you!
Here's another fun handmade gift idea for little ones that will also make their parents very happy. These adorable DIY stuffed animal zoos is a fun way to corral them all in one place in their rooms.
If you enjoyed this handmade yardstick growth chart idea, I'd be so thankful if you shared it with a friend and pinned it to your favorite board on Pinterest.
I share my projects at these inspiring link parties.


Comments
Post a Comment
Don't be shy, I love reading your comments and reply to every single one! If you want to be notified when I reply back to you, click the "Notify Me" button below the comment box.