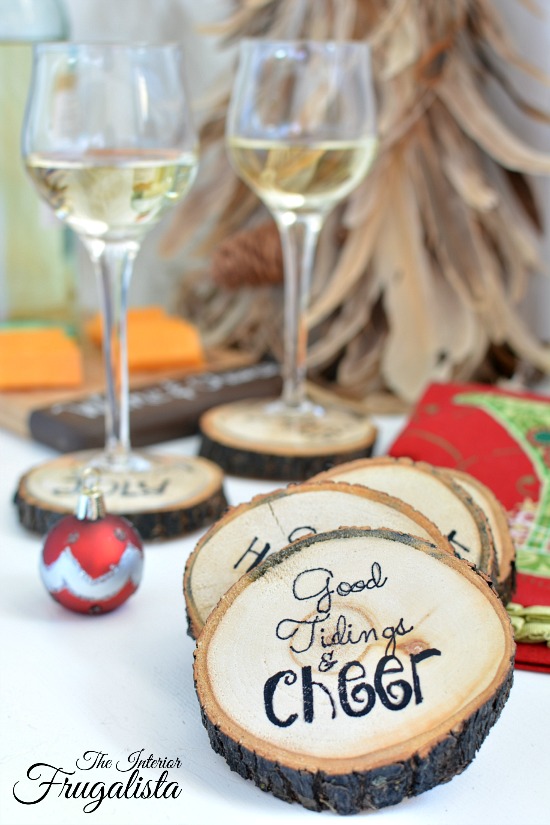
Fun DIY Wood Slice Coasters that will rock your holiday cocktails!
During the late spring snowstorm, we lost two 50-year-old trees in our yard. Thankfully we have a backyard fire pit so the firewood will come in handy. Last week while watching sipping my morning coffee and admiring the falling snow from my kitchen window my eyes caught a glimpse of that woodpile when inspiration struck. On went, the snow boots over my pajamas in search of the perfect size log to make these Fun DIY Wood Slice Holiday Cocktail Coasters.
While the inspiration for these coasters came from my woodpile, the motivation for making them came from the Power Tool Challenge team. The theme this month is Kris Kringle Holiday Edition. If you haven't heard of the Power Tool Challenge, it is a group of tool savvy, skill-sharing blogging friends who encourage and empower our female readers to step out of their comfort zone and try simple projects they can make themselves using a power tool.
Yup, I see it too...
There it is, my big fat spelling mistake that I didn't notice until after I published the post. It's not that I don't know how to spell, goodness I always won the spelling bees in grade school. Indeed, JOLLY is spelled with two L's and not one. I've since corrected the error on that particular coaster but decided rather than take brand new pictures and pretend the error didn't happen, I'd keep it real instead.
This post contains affiliate links so you can see what products I used or recommend for this project. As an Amazon Associate, I earn a small commission from qualifying purchases at no extra cost to you.
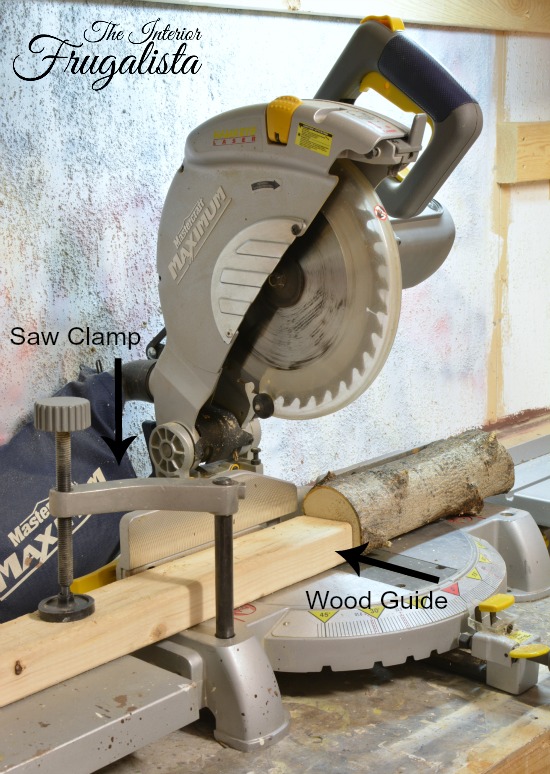
You must use a cutting jig like pictured above and described below and it MUST be safely clamped and secured with a miter saw clamp (like pictured above).
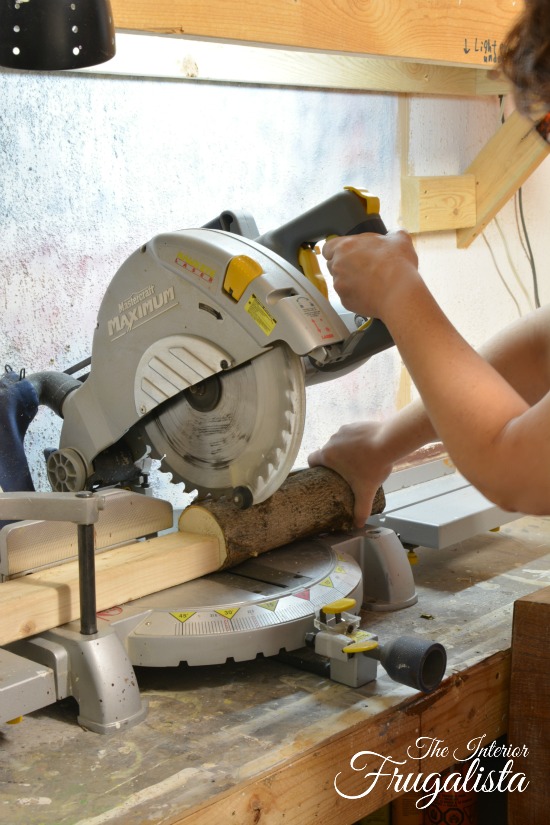
You need to turn the branch and situate it on the saw so it lays sturdy and hold on to the end with your right hand so it doesn't move on you. Stop cutting slices when the branch gets short and too close to your hand.
DIY Wood Slice Holiday Cocktail Coasters
While the inspiration for these coasters came from my woodpile, the motivation for making them came from the Power Tool Challenge team. The theme this month is Kris Kringle Holiday Edition. If you haven't heard of the Power Tool Challenge, it is a group of tool savvy, skill-sharing blogging friends who encourage and empower our female readers to step out of their comfort zone and try simple projects they can make themselves using a power tool.
Yup, I see it too...
There it is, my big fat spelling mistake that I didn't notice until after I published the post. It's not that I don't know how to spell, goodness I always won the spelling bees in grade school. Indeed, JOLLY is spelled with two L's and not one. I've since corrected the error on that particular coaster but decided rather than take brand new pictures and pretend the error didn't happen, I'd keep it real instead.
This post contains affiliate links so you can see what products I used or recommend for this project. As an Amazon Associate, I earn a small commission from qualifying purchases at no extra cost to you.
Cutting Wood Slices
The best option for cutting uniform wood slices is with a band saw. If you don't have a band saw you can do what I did and cut them with a miter saw (a sliding miter saw is even better). But you must be VERY CAREFUL.You must use a cutting jig like pictured above and described below and it MUST be safely clamped and secured with a miter saw clamp (like pictured above).
You need to turn the branch and situate it on the saw so it lays sturdy and hold on to the end with your right hand so it doesn't move on you. Stop cutting slices when the branch gets short and too close to your hand.
Wood Slice Cutting Jig
A great idea for ensuring the wood slices are cut straight and uniform thickness is to make a wood slice jig using a block of wood held in place with the miter saw clamp (as pictured above). Measure the distance from the end of the wood guide to your saw blade for the desired thickness (mine are 1/2-inch thick). Don't forget to wear eye and ear protection.
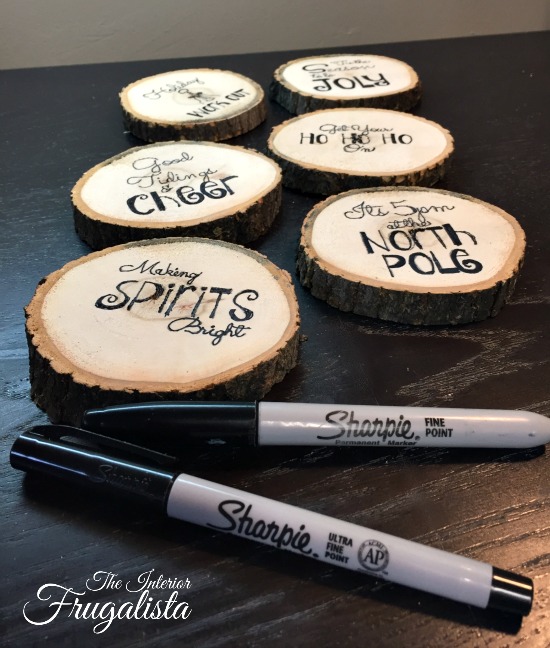
Create typography with your favorite software - I used PicMonkey. You can see there is a cocktail hour theme for my coasters. I've included a Free Printable of the graphic I used for your convenience. Click on the graphic below for your copy.
With a Fine or Ultra Fine Sharpie, trace over the transfer and let the ink dry for several hours before moving on to the next step.
Place the graphic print side down and hold firmly in place, being careful not to smudge the ink by moving the sheet. With the back of a spoon, rub over the back of the graphic until the ink is fully transferred onto the wood.
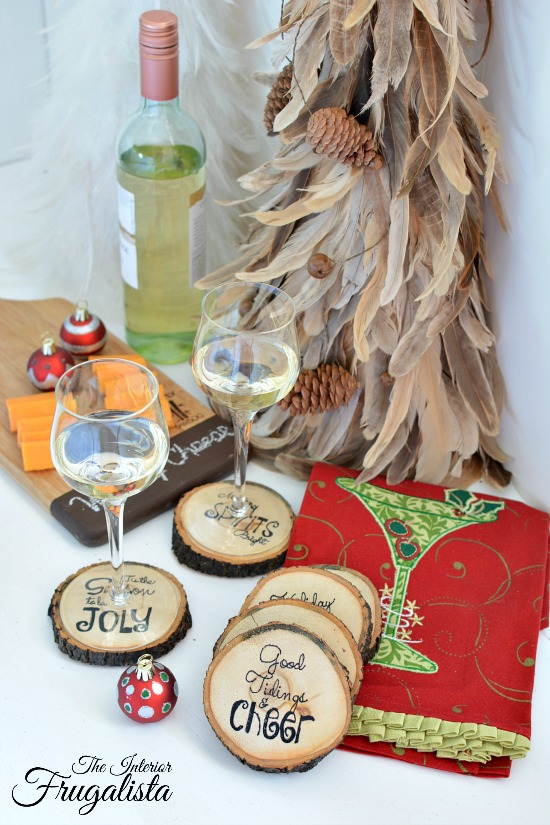
Your guests are sure to have a chuckle when setting their cocktails on these coasters during the holidays. They also avoid having to use wine charms to identify each person's drink.
The extra fun part of the Power Tool Kris Kringle Challenge this month is that our projects are part of a Secret Santa gift to a designated friend on the team. I made extra sets to include a bottle of wine for hostess gifts this holiday season.
I also made Wood Slice Map Ornaments that are great for the travelers in your life.
Fine Sharpie Pen
Graphite Paper
Shellac
Compound Miter Saw
I'd be so thankful if you pinned this idea or shared it with a friend. With gratitude! -Marie
If you have any questions about this makeover, please leave them in the comment section below or press the Contact Me button at the top of the blog to drop me an email. I love hearing from you!
I invite you to join me in visiting my Power Tool Challenge friend's blogs to see what they each made for their Kris Kringle challenge projects. Press the link below to see a thumbnail photo of their projects along with the link. If you like and are inspired by any of the projects, please pin directly from the blog posts.
You'll find this project shared with these inspiring link parties.
Prepping The Wood Slices
Using 180 grit sandpaper, smooth the surface on the top of each slice.Create typography with your favorite software - I used PicMonkey. You can see there is a cocktail hour theme for my coasters. I've included a Free Printable of the graphic I used for your convenience. Click on the graphic below for your copy.
Image Transfer Option 1 - Carbon Paper
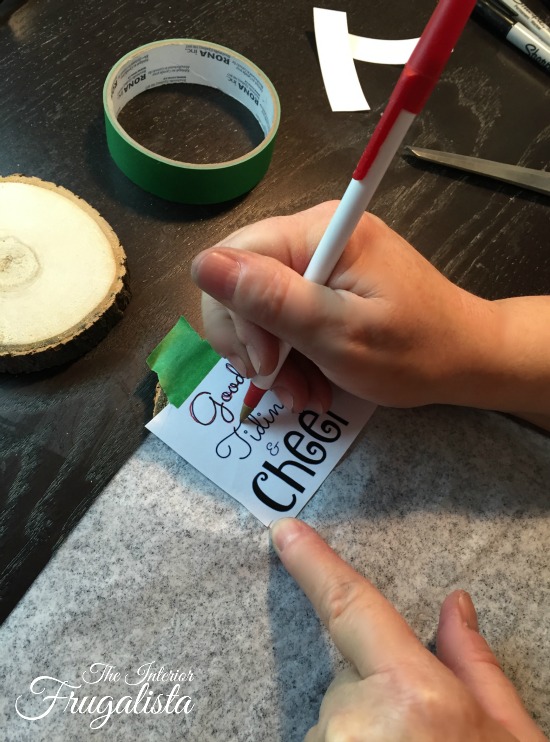
Print the graphics on bond paper and use carbon paper to trace them onto the wood slices (as pictured below).With a Fine or Ultra Fine Sharpie, trace over the transfer and let the ink dry for several hours before moving on to the next step.
Image Transfer Option 2 - InkJet Printer
Using an inkjet printer (a laser printer will not work) change the settings to print a mirror image (reverse) of the graphic. Print onto glossy paper (glossy side up). Photo paper, sheet labels with labels removed, or clear sheet protectors work great for this step.Place the graphic print side down and hold firmly in place, being careful not to smudge the ink by moving the sheet. With the back of a spoon, rub over the back of the graphic until the ink is fully transferred onto the wood.
Sealing The Wood Slices
Once the Sharpie ink is completely dry, spray two coats of shellac over each wood slice to seal and protect them. Add felt pads onto the bottoms to prevent the coasters from scratching furniture.Your guests are sure to have a chuckle when setting their cocktails on these coasters during the holidays. They also avoid having to use wine charms to identify each person's drink.
The extra fun part of the Power Tool Kris Kringle Challenge this month is that our projects are part of a Secret Santa gift to a designated friend on the team. I made extra sets to include a bottle of wine for hostess gifts this holiday season.
I also made Wood Slice Map Ornaments that are great for the travelers in your life.
Supply List
Wood SlicesFine Sharpie Pen
Graphite Paper
Shellac
Compound Miter Saw
I'd be so thankful if you pinned this idea or shared it with a friend. With gratitude! -Marie
If you have any questions about this makeover, please leave them in the comment section below or press the Contact Me button at the top of the blog to drop me an email. I love hearing from you!
I invite you to join me in visiting my Power Tool Challenge friend's blogs to see what they each made for their Kris Kringle challenge projects. Press the link below to see a thumbnail photo of their projects along with the link. If you like and are inspired by any of the projects, please pin directly from the blog posts.
You'll find this project shared with these inspiring link parties.






How did you manage to keep your wood rounds from splitting?
ReplyDeleteThe tree branch had been cut many years ago and was very dry so there was no risk of cracking or splitting.
DeleteGood morning !
ReplyDeleteThis article is very useful and thank you tout share this project :) . It's possible or not to cut large wood slices from branches (3 or 4 in of diameter) with a mitter saw ?
Best regards !
Sabrina RIGGIO
The best option for cutting uniform wood slices is with a band saw. But you can cut them with a miter saw, like we did, if you are VERY CAREFUL. You MUST have a jig (like I described above) and it MUST be safely clamped and secured with the miter saw clamps. You need to lay the branch down so it is sturdy and hold on to the end with your right hand so it doesn't move on you. Stop making slices when the branch gets short and too close to your right hand. As for the diameter of the branches, it depends on the size of your saw. Also, a sliding miter saw is even better for cutting them. I hope this helps!
Delete