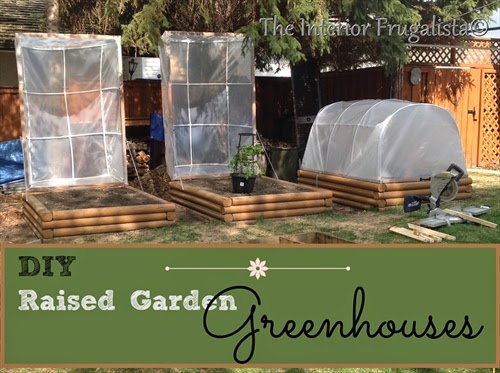
Budget-Friendly DIY Raised Garden Greenhouses
When living in a plant hardiness zone 3, the growing season is short. It is not uncommon to have snow in April and sometimes even in May. So to extend the growing season we have to get those veggies started early indoors or with greenhouses.
When you live in a small home like we do, starting them indoors is a challenge and building a greenhouse structure in our yard was not an option either. So we came up with an alternative option by building budget-friendly DIY raised garden greenhouses. We jokingly refer to them as the poor man's greenhouses.
DIY Mini-Greenhouses For Raised Gardens
The inspiration for the greenhouses came from Swing N Cocoa. We made a few modifications to ours that we'll discuss further down in the post.
What You'll Need To Make It
This post contains affiliate links so you can see what products I used or recommend for this project. As an Amazon Associate, I earn a small commission from any qualifying purchases at no extra cost to you. Thank you for your support!
Supply List
The supply list below is per greenhouse and is based on a 4' x 6' raised garden bed.
3 each 2 x 2 x 8 Lumber
5 each 10' PVC Pipe
8 Pipe Clamps
Wire Mesh
2 Hinges
1 Handle
4 each 3-sided Metal Corner Brackets
Galvanized Screws
Light Chain
6 mil Roll of Poly
How To Turn A Raised Garden Into A Greenhouse
Now that we've covered what supplies you'll need to build them, let's get to the instructions on how to turn a raised garden bed into a greenhouse. We'll begin the tutorial with how to build the mini greenhouse base.
Greenhouse Base
Cut the 2 x 2's at 45° angles the same length as your raised garden. Drill a pilot hole in each joint to prevent the wood from splitting when screwing them together. Add wood glue onto the joint and drill galvanized screws into each pilot hole.
Apply wood glue onto the joint and drill a screw into each pilot hole to secure the joints.
Install 3-sided corner brackets for extra support (sorry we forgot to take a close-up photo). This is important considering the greenhouses will frequently be lifted up and down.
PVC Greenhouse Frame
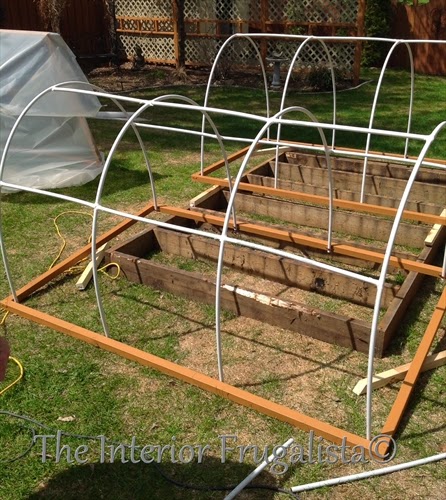
Secure pipe clamps along the inside of the frame on each side to support the PVC pipe. Ensure the distance between each pipe is measured equally. We purchased 1/2-inch PVC pipe in 10-foot pieces and cut them down to 8-feet.
Note: Don't throw out the 2-foot offcuts because we'll be using them in one of the next steps.
Insert the PVC pipe into the clamps and tighten the screws to secure it in place.
Find the center point of the greenhouse as pictured below...
This is where the salvaged 2-foot PVC cutoffs you saved earlier come in. We are using them for center supports (pictured below).
Secure the 2' pieces of PVC pipe running along the center of the tops of the PVC frame with white electrical tape. This will solidify the PVC frame and add support for the heavy poly. Alternatively, a more costly option for joining the pipe is using PVC tee fittings and couplings.
In the original design, she covered the PVC frame with wire mesh to offer more stability. She also questioned whether that step was necessary.
We attempted to install the mesh but got so frustrated and sustained a few flesh wounds in the process. So we decided to ditch that idea and come up with a plan B.
Helpful Tip
Rainwater will pool on the top, putting a lot of pressure on the poly and so you must have some kind of support along the PVC frame to prevent that from happening.
To add more stability we attached more strips of 2-foot PVC pipe just where the sides start to curve. Take a measurement from the base so they all line up perfectly.
What We Would Have Done Differently
- In hindsight, we should have run two more rows of PVC pipe on each side of the curve for added support to the roof.
- Save yourself the time and simply run four pieces of 6-foot PVC pipe along the curvature of the roof on the underside of the curve.
Covering Greenhouse Frame
Cut the poly large enough that it covers the front of the greenhouse as well. Starting in the center of one side, attach the poly to the bottom of the 2 x 2 base with staples.
Move to the opposite side and pull the poly taut enough that it removes any dimples in the plastic but not so tight that it distorts the shape of the PVC.
For the front and back of the greenhouse, pull the poly taut in the center and staple it onto the base. With a nurse's fold (think about how Grandma taught you to make a bed) fold the fabric taut in the corners on the inside of the greenhouse and staple it onto the base. Remove the excess plastic along the bottom of the base with a retractable knife.
Greenhouse Installation On Raised Beds
Set the greenhouse on top of the raised bed and secure it on the back of both the raised garden frame and greenhouse with two hinges. Inset the hinges about an inch on each side of the greenhouse.
To keep the greenhouse from flying backward when you open it or from a strong wind catching it, attach some light chain on each side as pictured below.
Attach a handle to the center of the base for easy lifting.
You can see in the photo below that I temporarily stuck some 2 x 2's into the soil and have them resting on the greenhouse bases for ventilation.
When time permits, I plan on coming up with a better system so they can be fully open on hot days and secured somehow on the back. If you have any ideas, I'd love to hear them in the comment section.
And there you have it, the poor man's greenhouse for raised garden beds. They might not be as pretty as a real greenhouse but they do the trick when you need to lengthen your growing season.
Important Tip
The poly roof will not withstand the weight of snow during the winter months so the greenhouses will have to be detached from the raised gardens and stored somewhere. It's an inconvenience we are willing to make if it means yielding a better veggie crop in our cold climate.
Do the greenhouses actually work?
I planted tomatoes the first week of June (three weeks ago) from 4-inch pots and already the plants have almost doubled in size with a lot of flowering and tomato growth, without the need for fertilizer.
Here's another idea for keeping those raised gardens fertilized and watered with our DIY Eco-Friendly Rain Barrel and Compost System. After finishing the greenhouses, we build a Repurposed Louvered Door Garden Screen behind the raised garden beds.
Thanks for stopping by the Interior Frugalista today! I hope you were inspired by these homemade budget-friendly mini-greenhouses.
Almost all of our DIY ideas have step-by-step tutorials so why not get your budget DIY on and subscribe. You can also find us on Pinterest, Facebook, Instagram, and YouTube.
If you have any questions, please leave them in the comment section below or the Contact Me tab at the top to drop me an email. I love hearing from you!
If you enjoyed this DIY raised garden greenhouse idea, I'd be so thankful if you shared it with a friend and pinned it to your favorite board on Pinterest.
I share my projects at these inspiring link parties.


.jpg)


Comments
Post a Comment
Don't be shy, I love reading your comments and reply to every single one! If you want to be notified when I reply back to you, click the "Notify Me" button below the comment box.