DIY Outdoor Water Wall Privacy Screen
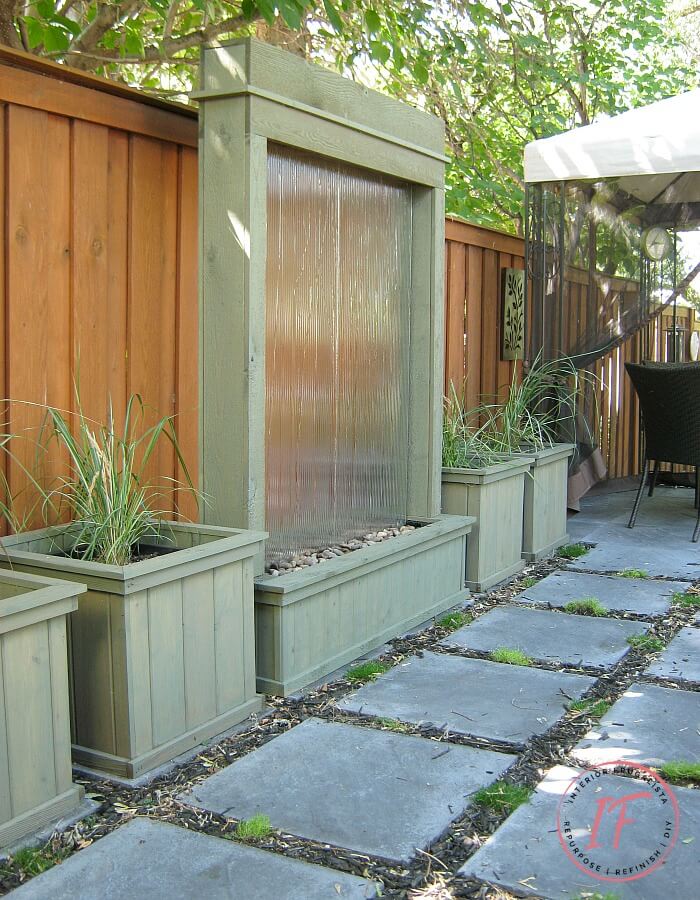
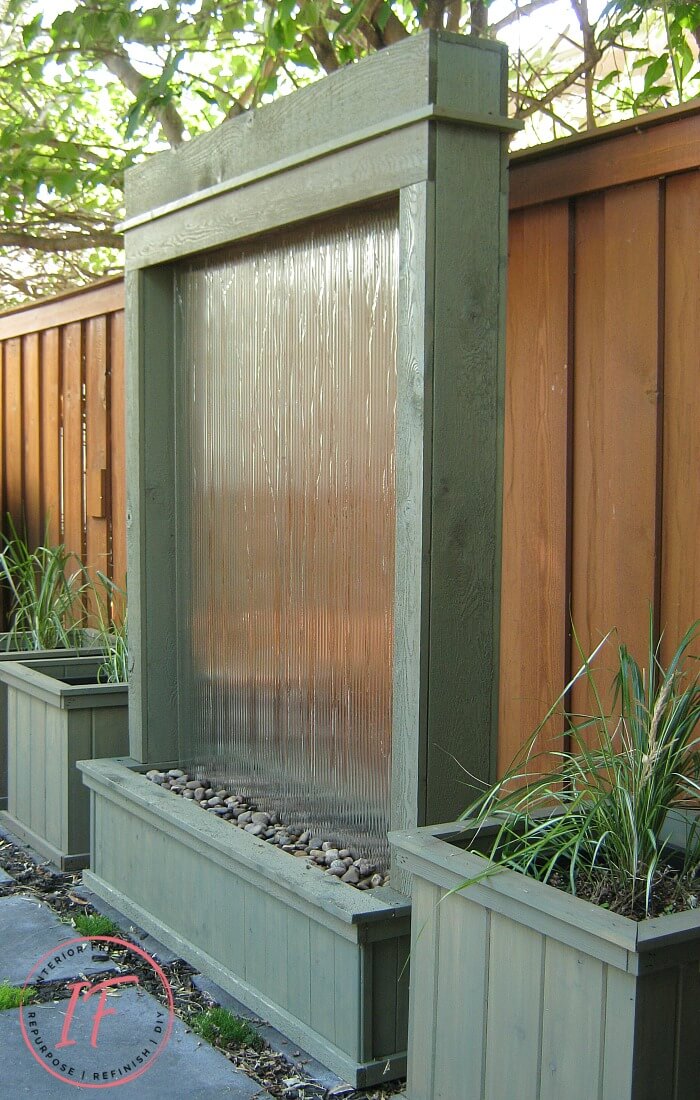
Finally, we have the backyard water feature we’ve been dreaming about for years! This post is about the journey of how we built a DIY Outdoor Water Wall Privacy Screen ourselves and how we did it for around $300.
Because we are not professional builders, sharing our outdoor waterfall build is intended to inspire you not to give up on a dream for your outdoor living space. Also, hopefully, it will encourage you to think outside the readymade box to get the outdoor water feature of your dreams with the satisfaction of building it yourself.
DIY Outdoor Water Wall Privacy Screen
Without any experience in this area of construction, we are proud of how we two amateurs created this wonderful trickling water fountain wall for our backyard. After a lot of searching, we figured if we were ever going to have a relaxing outdoor water feature that met our small budget, we would have to build it ourselves.
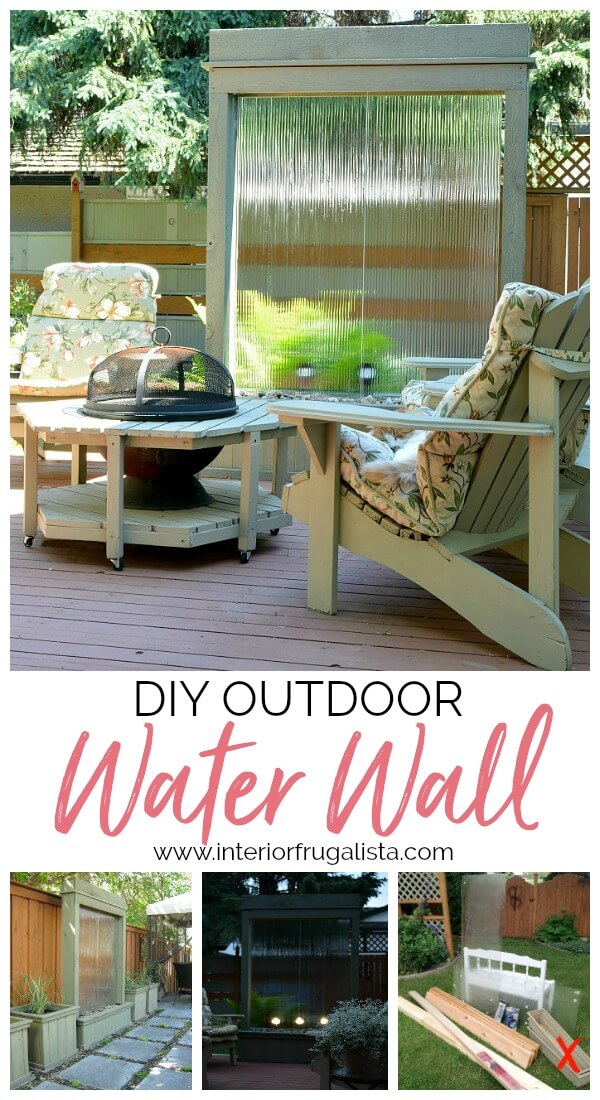
After a lot of deliberation, Mr. Frugalista and I came up with an idea we were both happy with. For one, it realized our dream for a large water feature in our yard, and two, it serves as a deck privacy screen.
Sourcing Water Wall Building Materials
Pen and paper in hand, we drew out the plans for our backyard water fountain and went on a mission to source building materials. What lumber to use was easy but what material we used for the water to trickle down was another thing.
The process of finding reclaimed tempered glass started with Mr. Frugalista searching for a sheet of copper. By happenstance, he came across two sheets of reed tempered glass at a local salvage yard for only $15 each. The direction for our water wall build suddenly took a new direction.
Suggestions For Water Wall Placement
Some ideas for where to place an outdoor water wall feature would be on a stone patio (like ours in the photo below), on a backyard deck as a privacy screen (like in the photo above), on a porch, or even an apartment balcony. For the latter, of course, you'd have to check with your condo board and make sure your balcony is rated for the weight.
Our patio water wall used to be situated on a stone patio adjacent to our gazebo. While it looked lovely flanked by matching cedar planters, the soft trickle of the water could only be faintly heard from the deck.
How To Build An Outdoor Water Wall
Here is the process of how to build a DIY water wall from conception to completion. The satisfaction that comes with a do-it-yourself project, especially with reclaimed materials, that can be made without breaking the bank is the motivation for most projects you'll find here on the blog.
"Our home has been renovated with sweat equity and like pages in a book, every room (indoors and out) has a story." ~Marie
This post contains affiliate links so you can see what products I used or recommended for this project. As an Amazon Associate, I earn a small commission from qualifying purchases at no extra cost to you.
Pictured below are most of the supplies we used to build our water wall, minus the two plastic flower planters on the right. I've included a materials and tool list further down in the post.
Instructions For Building A DIY Water Wall
We built this water wall feature for our own personal use and as I pointed out earlier, we are not professional builders. This step-by-step tutorial is based on our building knowledge only. However, if you are a do-it-yourselfer like us, you'll find these steps helpful if you plan on making a version of our budget-friendly DIY Water Wall.
We need to talk about safety...
Water Wall Dimensions
The size of the water wall is determined by the size of the tempered glass panels you use. We purposely did not include the dimensions of our tempered glass for this reason. Tempered glass is expensive and if you plan on building this in a budget-friendly fashion like we did, you will need to search local salvaged yards or places like Habitat ReStore for salvaged tempered glass. DO NOT use regular glass.
Water Wall: 60" high x 52" wide
Base Only: 12" deep x 18" wide x 52" long (outside measurement)
Step 1 - Base Construction
Build the frame for the base with 2" x 2" lumber as pictured below.
Step 2 - Water Trough Construction
Build a plywood box to fit inside the frame. This will house the pond pump, secure the glass to the base, and hold the water.
What We Would Do Differently
Had we to do it again, instead of building a separate water trough box we would simply line the inside of the base (pictured above) with plywood.
Step 3 - Base Assembly
You can skip this step if you incorporate our suggestion in the previous step.
Insert the box into the frame of the base. You can see it is raised from the bottom and supported by 2" x 2" lumber. Why? So the trough is shallower than the base to hold less water.
Step 4 - Glass Support Installation
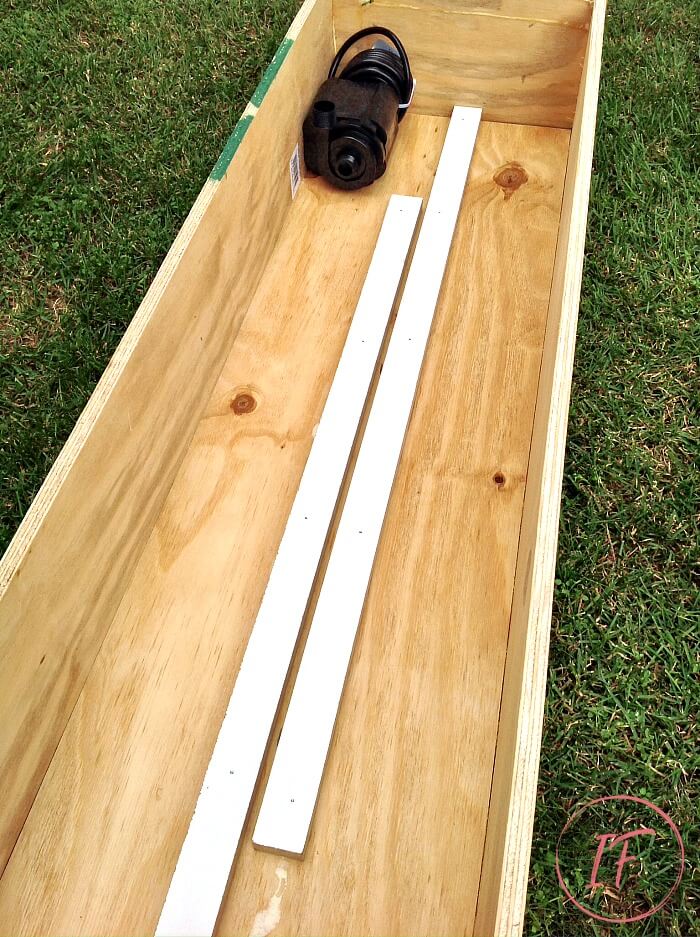
Attach wood slats to the bottom of the trough to secure the tempered glass panels to the base.
You can see in the photo below that the pond pump fits nicely between the glass and the sidewall. Please note, this is NOT the step where you install the water pump, at this phase, we are just providing a visual of where the pump will sit in Step 11.
Step 5 - Water Trough Liner
Line the water trough with a pond liner and attach it to the top ONLY with staples. At this point add some water and test to ensure there are no leaks.
Step 6 - Water Wall Uprights
Attach 1" x 6" x 60" pressure-treated deck boards on the outer center of each side of the base which becomes the uprights of the water wall.
Strap each side of the upright on the base with two pieces of a scrap deck board to make the sides flush for wrapping the tongue & groove around the base in the next step.
Step 7 - Finish Base Exterior
With a pneumatic nail gun, install the cedar tongue & groove closet liner around the exterior of the base.
Step 8 - Base Trim
Trim the base with ripped cedar fence boards and 1" x 1" wood slats.
Step 9 - Conceal Pump
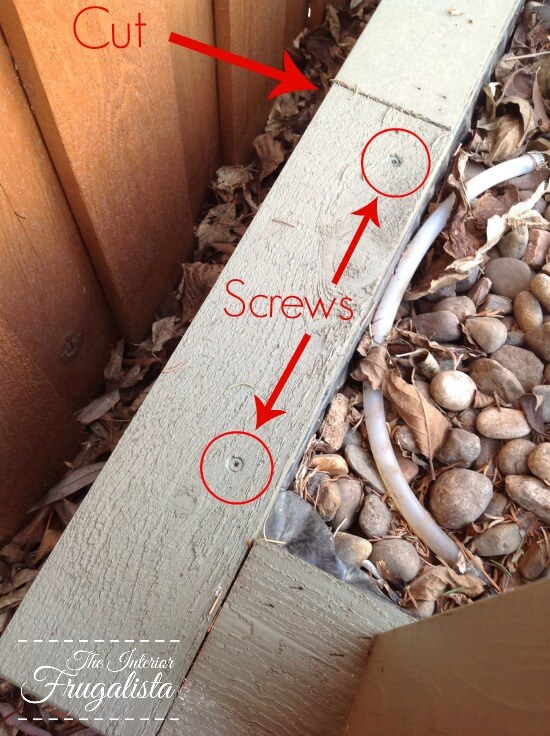
On the back of the base, on the side where the pump will be installed, cut a short piece of trim that will be screwed from the top. This will allow for the cord to be concealed underneath. Put it aside for now until Step 12.
Step 10 - Tempered Glass Installation
Installing the tempered glass is a two-person job.
- Mark the center of the uprights at the top.
- Secure one 2" x 2" on the backside of your mark.
- Place the glass between the grooves in the base and rest the top of the glass on the 2" x 2" you just installed.
- Secure the front 2" x 2" to hold the glass in place.
Step 11 - Water Tube Installation
- Place the pond pump on the bottom of the water trough as per the example in Step 4.
- Attach the flexible plastic tubing with couplings and clamps inside the center of the upright.
- Attach an elbow at the top.
- Using a 3/16" drill bit make holes in the top piece spaced about 1-inch apart. The size of the holes determines the strength of the water flow.
- Important: Drill the holes on the side of the tubing that rests taut against the glass to ensure the water trickles down the glass.
- Start with small holes and submerge the pump in a pail of water to test the flow. Increase the size of the holes in increments until you have the flow you desire. Take your time with this step to get the flow just right.
- Fill the end of the tube with silicone to seal it off.
- Use screws and large washers to hold the tubing in place into the top 2" x 2".
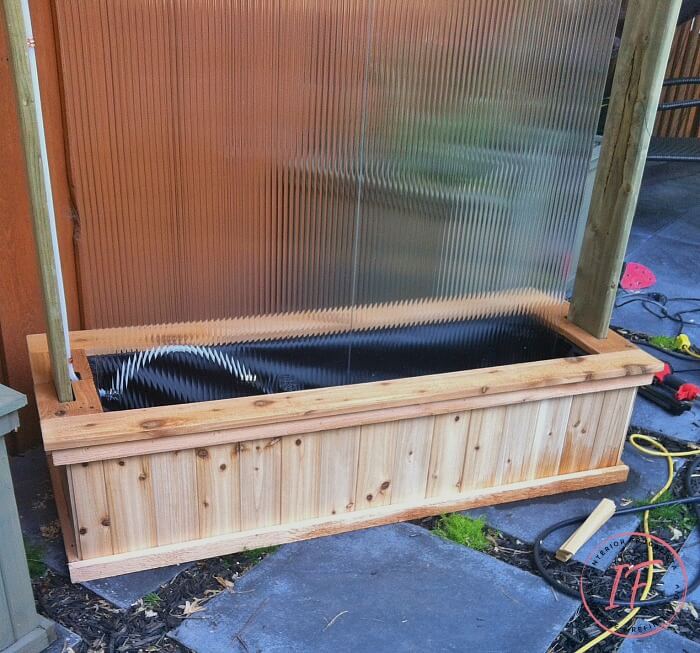
Step 12 - Conceal Water Tubes
Once satisfied with the water flow, conceal the tubing by boxing in around the uprights with cedar fence boards (pictured below). This is where you install the small piece of trim on the back from Step 9 to conceal the electrical cord from the pump.
Step 13 - Finishing Touches
- Last but not least apply two coats of stain. We used Behr semi-transparent in Sagebrush Green to match our cedar flower planters.
- Add paving stones to the bottom of the trough, being careful not to rip the pond liner. Or you could use lightweight pool noodles.
- Fill the rest of the cavity with river rock. The previous step simply helps decrease the amount of river rock you'll need.
- Note: If you prefer a louder-sounding water wall, skip the previous two points and let the trickling water hit directly onto the water in the trough.
- Fill the trough with water.
- Plugin the water wall and the pump will prime for a few seconds before the water starts trickling down the glass. Don't be alarmed by the sound.
How Often Do You Have To Replenish The Water?
It's important that you check the water level on a regular basis for water evaporation. Depending on how often you use it and the weather conditions, it may need to be filled more often.
We use ours only when we are outside and fill it with water about once a week. If you live in a hot climate and use your water wall every day, you most likely will have to top it off daily.
We choose a very soft trickle with smaller holes for a relaxing sound as the water hits the rocks below (pictured below).
How To Illuminate The Water Wall With Solar Lights
At night the water wall is backlit with a trio of spotlights (pictured below). Holes were drilled into the trim to hold the base of each light and the wires are concealed underneath. The solar panel is situated in our flower garden where it gets lots of sunshine throughout the day.
The spotlights are pointing upwards towards the glass. It's hard to see in the photo below, taken at dusk, but the entire glass is illuminated on the water wall.
As promised, I've included both a tool and materials list below.
Water Wall Tool List
- Table saw
- Compound Mitre Saw
- Power Drill
- Pneumatic Nail Gun
- Small Compressor
- Staple Gun
- Tape Measure
- Level
Water Wall Materials List
Pond Pump
- Check the rating on the Pond Pump to ensure that it will carry the water to the desired height. For example; if your wall is 5 feet high, the pump needs to be rated for a minimum 60-inch water lift.
- The pump needs to fit between the wall of the water trough and the glass.
- It is ideal to purchase a pump where the motor and value portion come apart. This will make it easier to remove the motor to store it indoors during the winter in colder freezing climates.
- Ours was purchased at Home Depot and is made by Angelo Decor, Model No. TPD-300H.
Pond Liner
Pond Liner - small sheet approximately 5' x 5'
Tempered Glass
As mentioned at the top of this post, the size of the water wall is determined by the size of the glass. For safety reasons, YOU MUST USE TEMPERED GLASS.
Water Tubing
- Flexible Plastic Tubing or Copper Tubing
- Approximately 10 feet (could use copper tubing if you're handy with soldering)
- Related connectors: 4 elbows and approximately 12 clamps
Lumber
- 2" x 2" x 8' (approximately 12 pieces)
- 1/4" or 3/8" plywood to build a water trough (approximately 4' x 4' sheet)
- 1" x 6" x 8' pressure treated lumber (2 pieces)
- 1" x 6" x 8' cedar fence boards (approximately 14 pieces)
- 1 pkg tongue and groove cedar closet liner
- 2 pieces of scrap lumber (to hold the glass inside the water trough)
Other Materials
- 3-4 bags of river rock
- wood screws (3-inch for base frame, 1 1/2-inch for all else)
- construction glue
- staples
- Solar Spotlights
Thanks for stopping by the Interior Frugalista today! I hope you were inspired by the DIY outdoor wall wall privacy screen. If you have any questions, please leave them in the comment section below or the Contact Me tab at the top to drop me an email. I love hearing from you!
If you enjoyed this DIY water feature, I'd be so thankful if you shared it with a friend and pinned it to your favorite board on Pinterest.

If building a large water feature is not an option, we also turned a trio of plant pots into a Plant Pot Water Fountain. We also made a Solar Powered Plant Pot Fountain option that can be made in less than 15 minutes.
Published in:
Country Sampler Gardens 2019 Magazine
Featured at:
Shutterfly Country Living HGTV Huffington Post










Like your idea. How is the sound of water heard?
ReplyDeleteIs it falling on the rocks?
How can u filter or make the sound louder?
Thanks,
Ata
Love your project.
ReplyDeleteI also found the glass I wanted at Habitat for Humanity.
How loud is the water?
How do u make it softer or louder?
What is the best pump to use if it is over 6' tall?
Glad to hear you found the tempered glass at Habitat ReStore, you probably saved a lot of money! Yes, you can hear the soft trickles of the water running down the glass and as it hits the rocks below. I share how to adjust the flow (which affects the sound) in Step 11 of the tutorial above. As for the best pump to use, check the rating on the pump to ensure that it will carry the water to the desired height. If your wall is 6' high, the pump needs to be rated for a minimum 72" water lift. I hope this helps!
DeleteI am excited to try this project. I just got my glass from Habitat ReStore. A great find
Deleteat $32.00.
Hello, this project says it is a $300 budget, where did you get your tempered glass?? I can't find it for a good price.
ReplyDeleteWe purchased the tempered glass at a local salvage yard for $15 per panel. Tempered glass is expensive so I urge you to visit your local Habitat ReStore or architectural salvage yards. Sometimes you'll find custom tempered glass panels that were incorrectly sized or shower doors.
DeleteThere is no way this is a $300 project, cedar board alone are $258 without tax.
ReplyDeleteSorry to disappoint but the total came to just pennies shy of $300, including tax! Our biggest savings was the tempered glass found at a salvage yard for $15. This project was posted on the blog in 2014.
ReplyDeleteHi..
ReplyDeleteQuestion..could you use plexiglass bra. Temperedglaas?
You could but my concern is whether the plexiglass will eventually get permanent staining from the water flow. Tempered glass is easy to keep clean and will not permanently stain. I hope that helps!
DeleteYou explain tempered glass is easy to clean, so I was wondering how do keep it clean. My concern would be algae growing in the water that would eventually stain the glass green. Do you use an algecide in the water catch basin?
ReplyDeleteWe don't add algecide to the water catch basin. We do regular glass cleaning when it looks to be dirty by spraying the glass with a garden hose and wiping it with a clean rag. Sometimes we'll use a magic sponge and water. We've never had a problem with algae build up.
DeleteWhat were the dimensions of the tempered glass you used? I can't seem to find it here.
ReplyDeleteThanks
I didn't include the dimensions of the glass purposely because the water wall should be built according to the size of tempered glass you find. Ours were salvaged custom size panels that would be difficult to find and we suggest trying to find one piece of glass rather than two, like ours. Base the dimensions of your water wall on the glass panel you can find.
DeleteI love it! I'm sure my husband will never think we need one of these, but I saved it...just in case!
ReplyDeleteHa ha ha, Cherryl. No one NEEDS a water wall but it sure is nice when you have one. LOL We love the sound of the trickling water when we relax on the deck.
DeleteThis is really beautiful Marie! I really want to make this!! You did such a wonderful job on yours! Pinned!
ReplyDeleteHugs,
Tee
Thank you very much Tee, I'm glad you like it! I hope you find the perfect piece of tempered glass to make one for your outdoor living space. I know with your mad DIY skills, it'll be beautiful!
DeleteWow, awesome project. Pinned
ReplyDeleteThank you so much Anita and for the pin!
DeleteI love this and need one for my backyard :) Thank you for sharing with To Grandma's House We Go, I'll be featuring you next week!
ReplyDeleteI'm glad you like our water wall, Chas and thank you so much for the feature! xo
DeleteWow! That is beautiful. I bet it's a wonderful addition to the patio.
ReplyDeleteThank you so much, Sarah! We absolutely love the sound of the trickling water when relaxing on the deck.
DeleteLOL Marilyn, I know you can cook up a storm so it's tempting!
ReplyDeleteYou are amazing... that is all. :-)
ReplyDeleteLOL You are so sweet, I'm glad you like the water wall Julie!
DeleteHello
ReplyDeleteMarie
I have been thinking for a while about a water wall, and I want to make it big 1800x1800 with clear glass,
but now maybe a strange question do you let the water flow against the front or the back of the glass?
thanks in advance and keep it up ������������
Jurgen
Hi Jurgen, the preference is all yours whether the water flows on the front or back of the glass. My suggestion would be to have it flow on the side that is seen most, like a conversation area like ours. Also, if you plan on using clear glass, be sure that it is tempered glass for safety. Hope this helps and have fun building your water wall!
ReplyDeleteYour project is beautiful! Very beyond my beginner do-it-yourself project, but inspiring! Someday I want a water feature in my yard.
ReplyDeleteThank you, Jeanne, I'm glad you like it! If it's beyond your beginner DIY skill set, perhaps you know someone who might be able to help you make it (when the world returns to normal, of course). We LOVE our water wall and I hope one day you'll be able to enjoy one in your backyard too!
DeleteWow, wow, wow! This is amazing! You broke it down really well to make it less intimidating.
ReplyDeletePamela~ DIY Vibes
Thanks so much, Pamela! I'm glad you found the tutorial easy to follow. We LOVE our water wall and can't wait to get it fired up soon for Summer 2020!
DeleteThis is gorgeous and my husband is on board! I think we'll have to leave it until things open up so we can look for the glass at a reasonable (ok, preferably cheap) price, but I can't wait! Did you make your planters as well?
ReplyDeleteYay, so glad to hear you'll be building one for your yard too! You are going to love it! We can't wait to get ours running again soon for Summer 2020. The planters we found on clearance at Home Depot a few years ago. They were our inspiration for the look of our water wall. I would love to see a photo of yours once it's completed.
DeleteI'm about to start building my version of the wall this week. Thanks for the helpful tips. I have a couple of questions - the cedar closet liners don't seem to be online anymore. Can you share the brand name? Also, in step 8, you mention 1 x1 slats, but they are not in the supply list and I'm not sure what type of wood that is. Can you share more details? Lastly can you share any more details or pics about step 12 - the boxing in around the supports? More details here would be very helpful.
ReplyDeleteHi David, glad to hear you'll be building your own version of our water wall! To answer your first question, we purchased the cedar tongue and groove closet liner at Home Depot here in Canada. I don't remember the brand name but you could use any tongue and groove style wood to get the same look.
ReplyDeleteTo answer your second question, in step 8 we mention that the 1" x 1" slats were ripped, meaning we made them ourselves on the table saw. The reason being is that we wanted the entire water wall to be built with cedar and we couldn't find that material in the store. An alternative is using furring strips in whatever wood is available.
Your question regarding step 12, you are basically wrapping the post while also concealing the tubing. Use whatever size of lumber that works based on your design. For ours, cedar fence boards worked perfectly. Some of them had to be cut down to fit.
As I mentioned in the post, these are not professional plans but our own design for our personal use with the materials that were readily available to us. Alter the plans for whatever building materials are readily available to you. I hope this helps!
If you have any further questions don't hesitate to press the "contact me" button at the top of the blog to send me an email.
Oh - Marie! This is amazing! Even without water flowing, the clear, wavy material looks beautiful as a piece of art. I am building a little oasis spot in my backyard - wish I had something like this to go in it - I am not handy with tools or wood though. I will just have to live vicariously through you ;)
ReplyDeleteAlexandra
EyeLoveKnots.com
Hi Alexandra, I'm glad you like our water wall! I can't wait to fill it with water this weekend and run it for the first time this season. We LOVE our water wall screen! Maybe you could hire someone handy to make a version for your little backyard oasis.
DeleteHi Marie, I want to build this for my husband as a gift on our anniversary this year. I have a question. Did you fill the reservoir with rocks? If so, how the pump is accessed if needed?
ReplyDeleteYes, we did fill the reservoir with river rocks. In order to access the pump, you need to remove the river rocks just where the pump is located on the one side. We've had to do it a few times and it takes little effort. I hope your husband loves the water wall surprise!
DeleteHi Marie, I finished making the water wall last week and would like to thank you and share the photos with you. What's the best way to send a picture of my project? Or maybe you can check them on my Instagram @lost_girl_in_reality
ReplyDeleteHi Tashnuva, I just checked the photos on Instagram and you did an amazing job! Love the sound yours makes too. You rocked it!!!
DeleteWondering how you keep the water clean
ReplyDeleteThat isn't an issue as the water does slowly evaporate and you replenish it at least weekly with fresh water. As long as you run the water wall often, you won't have an issue with stinky water.
DeleteWhen you add water how much do you add?
ReplyDeleteLove your idea... I'm toying with the idea of maybe having strips of glass with different angles meeting... we'll see. Thanks for the inspiration.
Hi Diane, fill it to the top so it lasts a good week or more, depending on your climate. Angled glass sounds very unique and intriguing.
DeleteJust started building this. Can't wait to finish it.
ReplyDeleteThat's awesome! Enjoy your new water feature and I'd love to see a photo when you're finished. Press the contact me tab at the top to send a message.
DeleteCongrats for this cool project and for the free detailed sharing. Really inspiring and motivating others that they can do it too on a low budget. I am doing this slightly differently, as it will be indoor, but want to ask your personal opinion on what do you think of leaving the water slide on both sides, as it will bi a divider between the kitchen and living area.
ReplyDeleteBarni, I think having the water run on both sides for a divider wall will be beautiful! Make sure you get a pump that can handle the dual flow.
DeleteHi Marie! I was just wondering- what is the measurement of the spacing between the 2 sheets of glass? Is there a required amount of space between them in order for the water to flow? Thanks!
ReplyDeleteHi, I'm not sure I understand the question. The two sheets of glass are butted right up against each other. Ideally, use one sheet of tempered glass if you can find it at a good price.
DeleteHi Marie, I love this! Would I be ok to use new railway sleepers and no glass? ie to let the water fall freely as a rain curtain?
ReplyDeleteGlad you like the water wall! To answer your question, first I had to Google railway "sleepers". LOL Good question! I have no idea how well they hold up to the constant flow of water. If algae will develop and how well the water pump would hold up to that. My suggestion would be to talk to a local pond supplier to see if you'll need to treat the water. Sorry I couldn't be more help.
DeleteThis is lovely! Just wondering if your stalled a drain plug to empty the trough in winter/fort cleaning purposes. If so, how did you do that? If not, do you wish you had?
ReplyDeleteThanks!
Rob
Hi Rob, thanks for the email you sent. My reply should be waiting in your inbox. But to answer your question here, we did not install a drain plug. Truthfully, once the river rocks are removed, it is fairly quick and easy to just scoop the water out. Although a drain plug is a good idea if you don't mind the extra costs and work.
DeleteHi is it possible to use polycarbonate sheet instead of glass? I have a panel from an old greenhouse
ReplyDeleteI can't see why not, as long as you keep it clean from algae not building up.
Delete
ReplyDeleteLike you design. With the price of lumber sky rocketing, we decided on an old patio door (80x36) instead and a metal basin from Tractor supply. It will be a chore to decorate the basin to be as pretty as your version but capping the metal with wood trim pieces should get it done. I think it could be done under $200 in today dollars. I will send you a pic when we complete it. Thanks again for the inspiration.
Oh I like where you are going with your water wall design and I'm very intrigued. I'd love to see a pic when you have it finished!
DeleteReally neat project, you did a great job. What do you think about using reclaimed tin from an old barn? Have a bunch and can't decide how to use it! (sorry if this is a repeat comment...)
ReplyDeleteHi Dana, initially we considered using a sheet of copper for the water to trickle down. While I think reclaimed tin would look fabulous, my concern would be it rusting and deteriorating into the water and damaging the water pump.
DeleteHello! Unrelated to the water feature but where did you find that incredible fire pit?!
ReplyDeleteHi Molly, we built the Adirondack fire pit too and you can find the instructions for building it here --> https://www.interiorfrugalista.com/2013/07/diy-adirondack-fire-bowl-table.html
DeleteLove this project. I want to make a much smaller version for my deck. I don't think I need or want to use glass at all. The instructions for installation of the pump are not clear to me. Are there any more detailed instructions between steps 4 and 8 that deal with the pump installation?
ReplyDeleteI'm thrilled to hear you'd like to make a small version of our water wall for your deck. I hope the following answers your questions about the pump installation: 1) The pump is placed inside the water trough AFTER it is lined with pond liner and the glass (if you choose to add it) has been installed.
Delete2) Then set the water pump inside the trough.
3) Run plastic tubing from the outlet (port) on the top of the water pump and hold it in place with a pipe clamp.
4) Run the plastic tubing upwards along the upright of the water wall as well as along the top of the water wall - as outlined in Step 11.
5) The pump electrical cord goes over the outer edge of the trough and follow Step 9 to conceal the cord with a piece of trim.
6) Scroll down to the Materials List and in the Pond Pump section is the suggested rating for the type of pump you'll need.
Can a solar powered pump be used?
ReplyDeleteI would question whether a rechargeable solar pump would have the power to lift the water to that height. You'd have to check the specs on the solar pump to see if it's rated for a minimum 60-inch water lift.
DeleteHi, my understanding is that you put the pump over liner and then fill the water through with river rocks? I am wondering if the pump will be able to pump the water when it submerged with rocks?
ReplyDeleteThere is a stem on the top of the pump where the water tubing gets attached, and it carries the water from the pump up to the top of the water wall. The rocks do not affect the flow of water. Placing river rock inside the trough is completely optional. I hope this helps!
DeleteHi, for the water tubing installation, does it go up, right (or left) and then down back to the water through? I just want to know the length of the tube and number of sections. Is it 2 or 3 section?
ReplyDeleteIt's your choice which side of the water wall you run the tubing. The tubing is attached to the output on the water pump and runs the height of the water wall and then connects to a plumbing elbow. Connect another piece of tubing to the elbow and run it the width of the water wall along the top. The length of the tubbing is determined by the height and width of YOUR water wall build. I hope this helps!
DeleteYou could probably use the twin-wall polycarbonate roofing panels instead of tempered glass. They are treated so they don't discolour. Safer, lighter and a little flexible. Also easy to cut if needed. You can also get them smoked or bronzed, which could add another interesting element to the feature.
ReplyDeleteYes, that is definitely another option! My only concern is how they withstand the constant flow of water and if they stain over time.
Delete