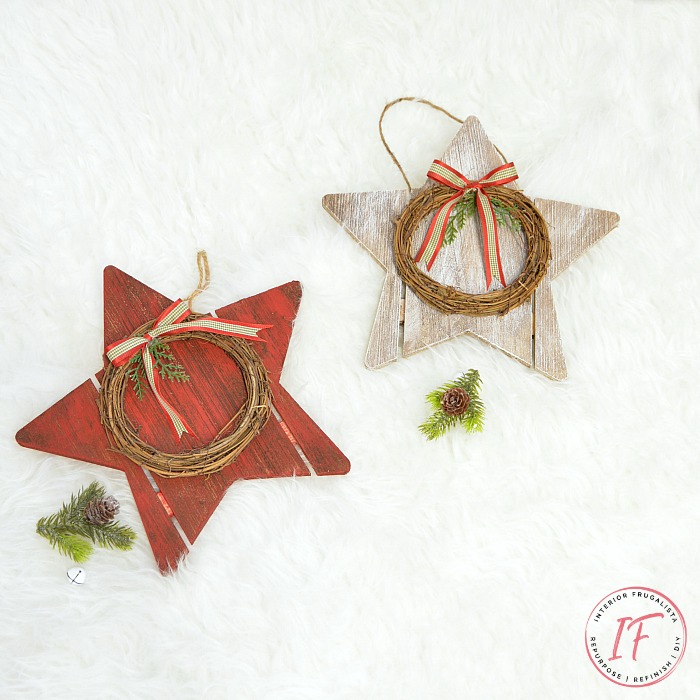
Dollar Store Christmas Wood Stars
Friends, it's time for another International Bloggers Club challenge and this month it's all about my favorite holiday, Christmas!
The rustic dollar store Christmas wood stars I'm sharing today are super easy and inexpensive DIY holiday decor that can be completed in less than thirty minutes! But I couldn't stop at just one, so I'm showing you how to give them two different rustic looks with farmhouse style.
DIY Rustic Christmas Wood Stars
The wooden stars would make lovely handmade teacher, hostess, neighbor, or secret Santa gifts. But you may want to make a few extra so you can have one or two for your home too.
Ideas For Where To Display DIY Christmas Wooden Stars
- Instead of a traditional holiday wreath, hang the wooden stars on a door or large mirror.
- Hang a set down a staircase with an evergreen garland.
- Simply lean the stars on a fireplace mantel or dining sideboard.
- Use a wooden star as a tree topper on a rustic, woodland, or farmhouse-style Christmas Tree.
- Hang a group of three vertically on a wall, barn wood, or wooden shutters.
Before we begin with the tutorial, I'm sad to say that this is the last International Bloggers Club challenge of 2019. We are taking a break for the holidays in December.
If you are new here and haven't heard of the International Bloggers Club, we are a group of bloggers from South Africa, Australia, the Netherlands, the USA, and Canada who come together on the third Monday of every month to share a DIY project with a common theme.
For our Flannel challenge in October, I turned a thrift store flatware box into a special Christmas Eve Santa Box lined with a recycled flannel shirt. You'll find our talented group's Christmas-inspired projects at the bottom of the post. Please be sure to check them out before you go.
My inspiration for this month's challenge came from wooden stars that I found at the dollar store for $4.
With very little paint and just a few supplies, they look like they've been around for decades and have that simple old fashion farmhouse Christmas charm.
What You'll Need To Make DIY Christmas Wood Stars
This post contains affiliate links so you can see what products I used or recommended for this project. As an Amazon Associate, I earn a small commission from any qualifying purchases at no extra cost to you. Thank you for your support!
Supply List
Wooden Stars
Red Chalk or Acrylic Craft Paint
White Chalk or Acrylic Craft Paint
Chip Brush
Dark Wax
6-inch Grapevine Wreath
3/8" Plaid Holiday Ribbon
Faux Evergreen Cedar Pick
Hot Glue Gun
How To Make DIY Rustic Christmas Wood Stars
They are so easy to make and the paint dries super quick with this dry brush technique.
Paint Wooden Stars With Drybrush Technique
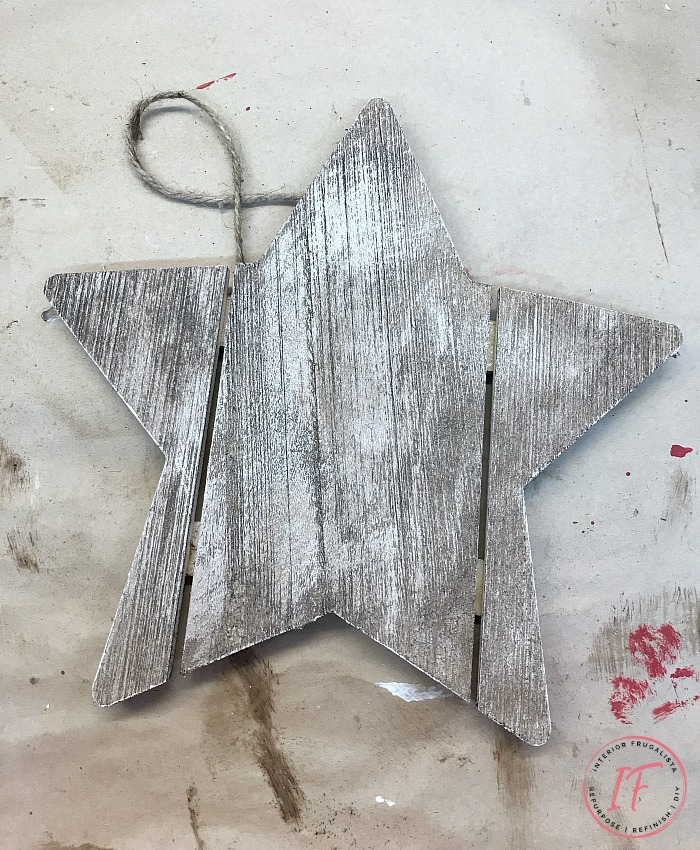
Dip just the tips of an inexpensive chip brush into water-based chalk or acrylic craft paint. Dab the brush onto a paper towel to remove the excess paint. You want the brush to be dry - hence the term drybrush.
With very light pressure, swipe the brush across the star in one direction just hitting the raised texture of the wood. Let the paint dry (mere minutes) and then swipe the brush in the opposite direction.
The goal is to make the wood look like faded timeworn paint. I used FAT chalk style paint in the color Red Barchetta on one star and white Behr Chalk Decorative Paint on the other.
Age Painted Wooden Stars
Now we want those painted stars to look even more timeworn and it's so easy to get the look with brown antique wax. Brush the brown wax over the painted star and then remove the excess wax with a lint-free rag.
You can see the difference between the waxed star in the middle and the unwaxed sides of the red star in the photo below. See how the wax nestles into the grain of the wood?
Next, we'll add some embellishments to make the DIY rustic wood stars look festive for the holidays.
Embellish Dollar Store Wood Stars With A Small Wreath
The small grapevine wreaths may look familiar because they are identical to the same ones I used on the Rustic Christmas Joy Signs.
Simply attach a six-inch grapevine wreath onto the middle of the wood star with a hot glue gun. Tie and simple bow with a 3/8-inch plaid holiday ribbon and hot glue it onto the top of the grapevine wreath.
Tuck a couple sprigs of faux evergreen behind the bow and we're done. See, I told you it was easy!
Thanks for stopping by the Interior Frugalista today! I hope you were inspired by these DIY Christmas Wood Stars.
Almost all of our DIY ideas have step-by-step tutorials so why not get your budget DIY on and subscribe. You can also find us on Pinterest, Facebook, Instagram, and YouTube.
If you have any questions, please leave them in the comment section below or the Contact Me tab at the top to drop me an email. I love hearing from you!
If you enjoyed this dollar store Christmas wood star craft idea, I'd be so thankful if you shared it with a friend and pinned it to your favorite board on Pinterest.
I invite you to click on the links below to visit our talented group members' Christmas ideas. If you don't have time today, you can bookmark the page by pressing the pink heart icon on the right to come back later.
Embroidery Hoop Advent Calendar | Northern Feeling
Flower Broom Christmas | A Crafty Mix
Easy Farmhouse Christmas Stocking Holder | Raggedy Bits
Corner Christmas Tree Shelf | Unique Creations By Anita
Rustic Dollar Store Christmas Wood Stars | Interior Frugalista (that's me)
I share my projects at these inspiring link parties.


Wow, I didn't realize they were so big until I saw the one piccy with the star and the glue gun. How lovely Marie and they sure do look like they've been around for a long time. Love the red one. If I didn't see your tutorial I would have said that one came straight out of Santa's workshop ;-)
ReplyDeleteThey really are quite large pallet style stars that are big enough to use as a door wreath. The red one is my favorite too and I'm looking for a spot to hang it in my house.
DeleteMarie I was just at the dollar store today and didn't see one of these. Either you took them all or they don't stock them in my store. But after seeing your idea I am determined to find some and copy it. Merry Christmas dear friend.
ReplyDeleteOh no! Last time I checked they still had plenty in stock. I'd be happy to pick some up for you and send it your way. PM me if you're interested. Merry Christmas back to you sweet friend! 🎄
DeleteThese stars are really cute. You took boring stars and made them shine. The red is my favourite and I would never have thought to use the dark wax to age it. I will keep that in mind. They will look great on a porch.
ReplyDeleteI knew you'd love the red one Anita! LOL Psssst, it's my favorite too 😉 Yes, these stars would definitely look great on a porch or door overhang.
DeleteGotta love the Dollar Store! You really gave them such a pretty & festive makeover, they did look a bit blah before. But now, wow! Love the little wreath in the middle for that extra something!
ReplyDeleteThank you Katrin! I love me the dollar store and we have several in our little hamlet to choose from. I'm so pleased with how they turned out that I might pick up a few more.
DeleteI love the red wood, very nice project! Need to check my dollarama now!
ReplyDeleteThat's exactly where I got them!
DeleteThese are very cute, Marie. I wish they were a little smaller, though. If the grapevine wreaths are 6" the stars must be close to seven which are too big to hang on my little tree, I think. We don't have a Dollarama down here in Michigan--at least in the Lansing area. Wonder where I could find similar stars. Maybe Dollar Tree. Anyway, thanks for sharing this project. I really like the rustic look you gave the ornaments.
ReplyDeleteDefinitely too large for a small tree but perfect for a regular size tree. I hung mine on mirrors. Dollarama is a Canadian dollar store chain. I haven't checked our local dollar tree to see if they have them. I bet you can find them at your wonderful Hobby Lobby stores.
DeleteYou turn the stars into high end ornaments. They came out just lovely.
ReplyDeleteYou just made my day, Debra! What took next to nothing to make would cost a good penny readymade at a retailer. Which is the joy in doing what I do.
DeleteMarie, these are just great! I really like them, and they DO look "antique-y". Good job. Happy Thanksgiving from America!
ReplyDeleteThank you Ceyla, I'm glad you like them and Happy Thanksgiving from Canada! We celebrate ours in October so we're full on Christmas over here.
DeleteI spent 12 hours vacuuming our attached garage from years of sawdust, used the air hose to get in the corners, and then eureka did it all over again. So this Christmas I refuse to cut anything. This star idea is perfect for me, and I can make them in pink for my little ones bedroom. So pretty and easy
ReplyDeleteYikes, that's a lot of vacuuming! I don't blame you for not wanting to cut anything now. You'll find the stars at Dollarama. Happy painting!
DeleteI love stars your Christmas version is lovely! The candy cane striped ribbon is adorable!
ReplyDeleteThank you so much, Audra, they were such fun to make!
DeleteThese are really big! I love them! I wonder if these wooden stars are at one of my dollar stores?
ReplyDeleteThey are quite large, Julie. I found mine at Dollarama, an amazing Canadian dollar store chain. Wondering if maybe your Hobby Lobby might have them.
DeleteOh my goodness... you managed to turn dollar store stuff into MEGA dollars... adore those mini wreaths!
ReplyDeleteI've featured this project in this weekend's DIY Salvaged Junk Projects 503... thanks for bringing it over! :)
Glad you like them, Donna and thank you so much for the feature! Love our Canadian Dollarama chain, sometimes it feels like my second home. LOL
DeleteSuper cute, Marie!
ReplyDeleteThanks Lora! So easy peasy and inexpensive to make.
DeleteI'm loving how your rustic Christmas stars turned out! Thanks for sharing at the Home Matters Party.
ReplyDeleteThank you very much Allyson!
Delete