Repurposed Bookcase Dollhouse DIY Windows and Door
Time for another update on the progress of our miniature fixer-upper. This time I'm sharing how we added dollhouse windows, adorable window boxes, and a front door to our repurposed IKEA Billy Bookcase Dollhouse.
Dollhouse Miniature Plexiglass Windows and Front Door
Everything about this dollhouse is made with repurposed finds or DIY projects. The front door is made from a repurposed jewelry chest. One of those DIY dollhouse miniature projects is a realistic fireplace with a flickering flame.
The post contains affiliate links so you can see what products I used or recommend for this project. As an Amazon Associate, I earn a small commission from qualifying purchases at no extra cost to you.
It all started thanks to the inspiration found in Jen Crider's Amazing Furniture Makeovers book. On page 119, she shares how she turned the top portion of a hutch into an adorable dollhouse.
When we saw the IKEA Billy Bookcase at our local Salvation Army store for $14.99, I knew we found our dollhouse!
We turned some of the shelves into walls, added a pitched roof, and flooring. You can follow the entire series on our dollhouse page.
I've been wanting to work on a dollhouse for a few years to gift my granddaughter. She's only nine months old so I have some time to get it done.
For the front door, we repurposed a door from a vintage jewelry box.
Here's a close-up of what it looks like on the outside of the dollhouse, painted a welcoming red.
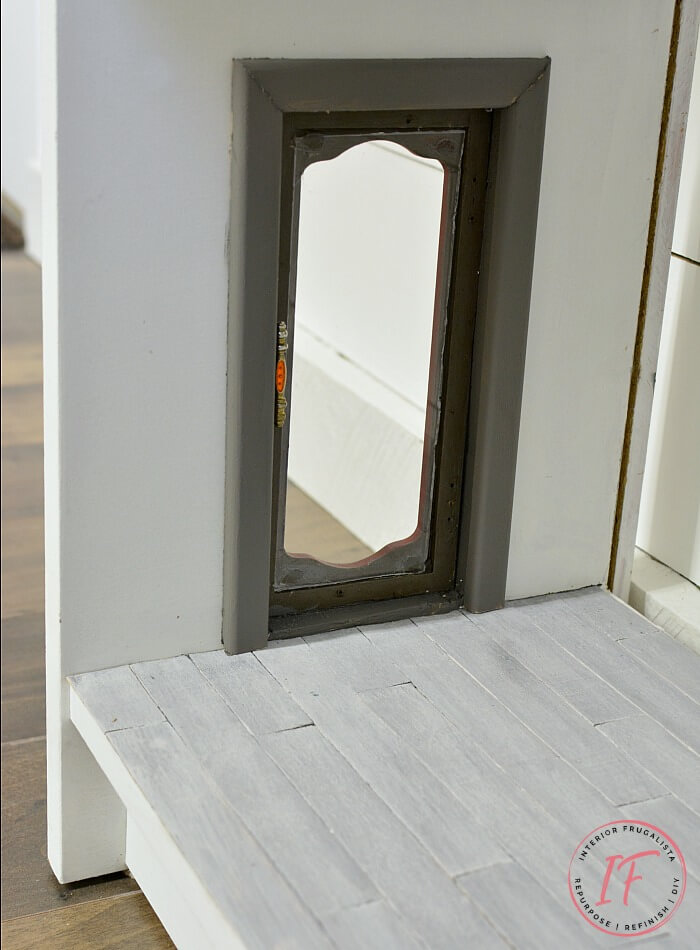
This is an interior view of the front door painted charcoal gray to complement the whitewashed hardwood floors in the living room.
We also added five plexiglass windows to the dollhouse, each with its own adorable window box. The two bedrooms and dining room windows are the same sizes, the kitchen window is counter height, and the living room window is much taller.
I'll show you how easy it is to make the adorable window boxes with tongue depressor craft sticks further down in the post.
I think the windows and front door add so much charm to the dollhouse bookcase. There is still so much to do before getting to the furnishings and decor stage. My grandson keeps telling me how Barbie needs a kitchen!
Here's How I Made It
Listed below are the power tools you'll need to make the windows and door openings.
My daughter borrowed my relic jigsaw and so I used that as the perfect opportunity to buy myself a new one. As my friend Larissa at Prodigal Pieces always says, tools before jewels!
I've included the detailed instructions for the dollhouse windows and doors below. We'll begin with the repurposed jewelry box dollhouse front door.
Repurposed Jewelry Box Dollhouse Front Door
The door frame was traced with a pencil on the inside of the dollhouse to accommodate for the height of the floors. The original glass on the jewelry box door is replaced with child-safe plexiglass for the safety of those little hands.
We reused the original hinges and door handle from the vintage jewelry box. The handle on the inside of the door is from a second vintage jewelry chest that I had in my stash.
DIY Dollhouse Plexiglass Windows
For the window cuts, we made a template with scrap wood and marked the center. Then we marked the center of the walls. We found something to use as a gauge for the height of the window and traced the window outline with a pencil (as pictured below).
To cut the dollhouse windows we drilled pilot holes for the jigsaw to pivot around the corners.
Next, the dollhouse is laid on its side to cut the openings with the jigsaw. Then the openings were sanded smooth with a mouse sander and 150-grit sanding pad.
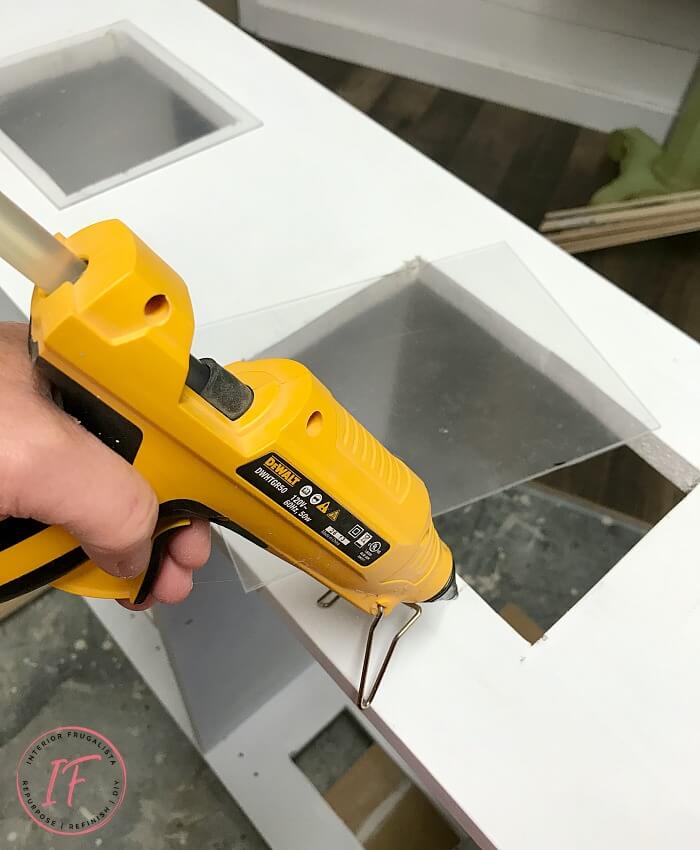
Plexiglass was cut slightly larger than the window openings and hot glued onto the outside of the dollhouse. We did it this way so there is a ledge on the inside of each window. Before the plexiglass was installed, the window frames were painted white.
To add window trim, a small decorative trim is cut at 45° angles and glued to the inside and outside of the window frames. Once installed, they were painted white.
DIY Dollhouse Window Boxes
The large craft sticks from the dollar store that were also used to make the hardwood floors came in handy again to make cute window boxes. Initially, I was going to trim the rounded ends square but I decided against it because they added a fun childlike whimsical charm.
To make them they were hot glued onto MDF blocks cut to size. Then I added more craft sticks for the sides. Easy peasy!
Next, I painted the window boxes red with Emperor's Silk chalk paint, the same paint color used on the front door. To give them a timeworn appearance I applied dark wax with a lint-free rag and then glued them onto the dollhouse with hot glue.
The window boxes were filled with small grape hyacinths and cherry blossoms from dollar store floral picks and attached with hot glue.
The solid color of the pink cherry blossoms looked too fake. To add depth I used a small fan brush and swiped the petals with the same red chalk paint used on the front door and window boxes. It made a big difference!
Now with the addition of windows and doors, the repurposed IKEA Billy Bookcase is looking even more like a dollhouse. Next up is installing real wood baseboards and papering the walls.
Almost all of the DIY projects shared here at Interior Frugalista have step-by-step tutorials so why not get your budget DIY on and subscribe. You can also follow us on Pinterest, Facebook, Instagram, and YouTube.
Thanks for stopping by the Interior Frugalista today! I hope you were inspired by these ideas for dollhouse windows and doors.
If you have any questions, please leave them in the comment section below or the Contact Me tab at the top to drop me an email. I love hearing from you!
If you enjoyed this dollhouse window and door ideas, I'd be so thankful if you shared it with a friend and pinned it to your Dollhouse Miniatures or Dollhouse Ideas board on Pinterest.
I share my projects at these inspiring link parties.


I bet you are enjoying this project. The most fun we had ever was building the dollhouse for our Grand....and she loves it. This is such a labor of love, can't help but smile!
ReplyDeleteI can't wait to see the look on my granddaughter's face when it is delivered to her room when it's done. By the time I'm done (have so many plans for this dollhouse) she'll be old enough to play with it. Glad you're enjoying this series Sandi and I appreciate the visits. 😊 Thank you!
DeleteOh Marie, I'm so happy you're doing this series. Love, love, love what you used for the front door. That's brilliant and those window boxes - WOW!!! You put so much thought into the doll's house. Your granddaughter is going to be so excited when its finally finished. I can just picture her playing house for hours. Such a lovely gift
ReplyDeleteThank you Michelle, I'm happy your happy that I'm doing this series! My 4 year old grandson saw it in the workshop when getting new batteries for a toy with Grandpa. He parked himself there for hours and asked if it could be for two kiddos instead of just his little sister. LOL
DeleteThis is totally too cool for school!! Your granddaughter will love it! Super congrats on being rockstar amazing!
ReplyDeleteWell you sure know how to make a gal's day my friend 🤗 My grandson ended up seeing it in the workshop and next thing you know an hour goes by and he's still playing with it. He asked if it could be for two kiddos and not just his little sister. LOL
DeleteI love the bookcase dollhouse. It is adorable and I'm sure any little girl would enjoy having one so open and big to play with! The roof adds so much to the look of a "house" and the window boxes are adorale. This is a true winner!
ReplyDeleteThank you so much, Barb. It's been such a fun project to work on and I'm flooded with ideas to add to it. Lots more to do before I get to the DIY furniture and home decor stage...but I'm not complaining. 😆
DeleteHow cute is this?? I've been wanting to make a dollhouse for my granddaughter. She is 4 months old so I better get in gear. I love that it is on a bigger scale so you can really get in there and play. Such great ideas! I love the "planked" floors!
ReplyDeleteThank you so much Kelly! It's been such a fun project and I have so many ideas for DIY furnishings and decor. I promise, you'll have a blast making one for your granddaughter.
DeleteOooh, that is so cool! And using the jewelry box was genius!!
ReplyDeleteTania
Thank you Tania, means a lot coming from a dollhouse expert, yours is amazing!
DeleteOh how I'd love for my daughter to be young again so I could make her one of these. Brilliant! Thanks for sharing.
ReplyDeleteThanks Chas 😊 Maybe one day like me, you'll get to make one for a granddaughter!
DeleteI am totally in love with the project. I had to share it with my husband too.
ReplyDeleteHave a great weekend,
Kippi
Pinning!!!
I'm so glad you like it, Kippi 😊 and you made me smile when you said you shared it with your husband. It's been such a fun project to work on! Thanks for the pin and happy weekend to you too!
DeleteI love this post! I built a doll house for my youngest daughter and I think I enjoyed it as much as she did!
ReplyDeleteLOL, the same is happening here with me! Such a fun project and I can't wait for my granddaughter to be old enough to have it in her room.
DeleteI adore this, sadly my grand-daughter is now far too grown up so I won't get the fun! But just gorgeous...
ReplyDeletePamela
www.style-yourself-confident.com
Thank you Pamela, this has been such a fun project.
DeleteThank you for the share and pin, Marilyn!
ReplyDeleteThis is so cute! We are working a dollhouse using an ikea bookcase. How did you secure and reinforce the top of the front of the house to the bookcase?
ReplyDeleteHi Diane, we attached the front peak with wood screws from underneath the top of the bookcase. Then we filled the screw holes showing on the ceiling with putty and painted the ceiling. I hope this makes sense and have fun with your dollhouse project!
Delete