DIY Dining Room Makeover Reveal
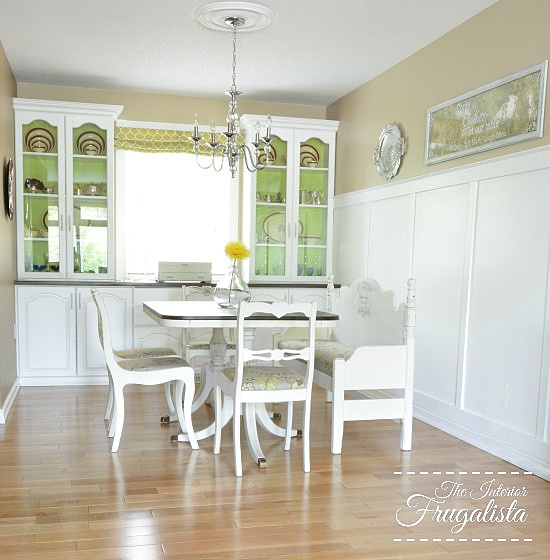
Today I'm sharing the DIY dining room makeover reveal of our small 1960s humble abode. The goal of this last phase of the makeover is to liven up and brighten the small dining room. What a huge difference and all it cost was a can of paint! Not only did it add so much light to the room but it completely changed the mood of this space too.
We love that our dining room went from a dark and dreary space that no one wanted to spend much time in, to a bright and cheery space where we now congregate. Instead of absorbing light, the room now reflects so much you'd think we added a window! We couldn't be happier with the results of this transformation.
DIY Dining Room Makeover: How White Made A Huge Difference
The goal for our DIY dining room makeover was to get rid of the dark brown-on-brown tones going on in the room. Between the dark walnut stain on the built-in cabinets, dark walnut-stained tabletop, dark brown parsons chairs, and the taupe wall color, the room felt so heavy.
Pardon the mess on the table in the before photo below, I forgot to take a picture before starting to dismantle the room.
In phase one of the DIY dining room makeover, we added a board and batten feature wall to add visual interest to the long wall that runs the span of our dining room and living room. Instead of chair rail height, we opted for a taller wainscotting to add visual height.
Painting the feature wall white really helped add brightness to the room, but it also makes it feel larger. But we're not done with the white paint just yet!
An Affordable DIY Dining Room Makeover
Besides adding a board and batten wainscotting feature wall in our DIY dining room makeover, in this phase, we are changing the color of the dining room cabinets.
Painted Built-In Dining Room Cabinets
This is the third makeover of our custom built-in dining room cabinets. Originally they had a golden oak finish.
Then we stained the built-in dining room cabinets dark walnut.
What were we thinking, too much brown! With this room makeover...the wood lovers are going to hate us...we painted the cabinets white!
What a night and day transformation!
I could hear my uncle's voice in my head (from whom we purchased our home) gasping with every paint stroke on HIS custom cabinetry. Sorry, Uncle Billy! We did keep the dark walnut stain on the top of the lower cabinets.
Ideally, we would have loved to replace the door fronts but this is a room makeover on a budget so painting them was the next affordable option.
For a lasting paint finish, we applied the same techniques used in our affordable kitchen makeover. Now, the dining room cabinets match the painted kitchen cabinets but they also match our DIY built-in fireplace in the living room. All three rooms have visual sightlines to one another so it is important they have a cohesive flow.
Painted Upper Cabinet Backs
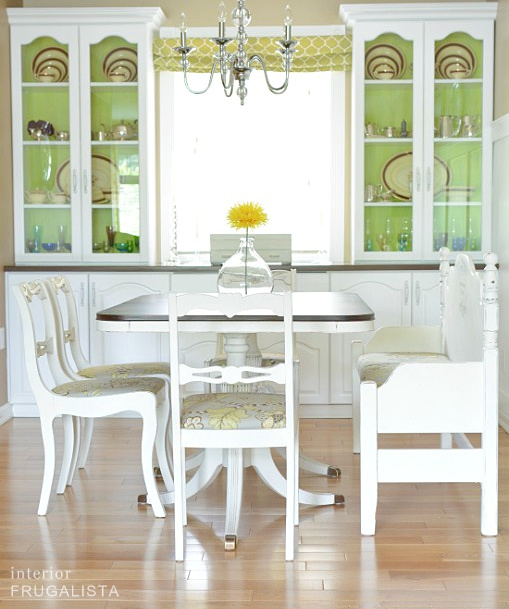
We added a pop of color to the back of the upper glass door cabinets. They have a paintable beadboard wallpaper back that unless you touch it, looks just like the real thing. They are painted with two coats of Luscious Lime by Country Chic Paint but unfortunately, they've since discontinued the color.
To tone down the lime color a little, I brushed a light coat of white wax. I love how the lime green makes the white cabinets pop.
Removing Scalloped Wood Valance
We removed the scalloped wood valance between the upper cabinets that framed the window.
Instead, we added a heavy crown molding around the top of each upper cabinet and framed the window with a faux roman shade. I think I need to decrease the width of the roman shade valance so it is an inside mount instead?
You can see in the photo above and the one below that even the flatware chest displayed on the built-in china cabinet unit was painted white too!
Updating The Dining Room Cabinet Hardware
To save money, instead of replacing the bronze handles on the dining room cabinets, I painted them. They are spray painted a primer white and lightly distressed with sandpaper. I didn't want high contrast so the white color makes them blend in with the cabinet.
What a difference a can of white paint made to our DIY dining room makeover but you probably noticed in the photos that the furniture has changed too!
Dining Room Makeover Upcycled Furniture
Remember the dark brown vinyl parsons chairs in the before photo? Those went to our daughter's home. The oval pedestal dining table got a grey and white modern farmhouse table makeover and now resides in my nephew's home.
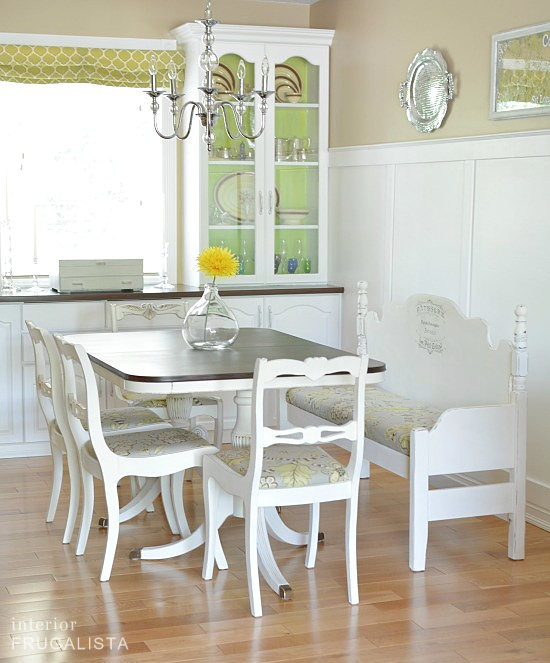
We hit the jackpot when we found a Duncan Phyfe dining table at Goodwill. I painted the table base white and stained the mahogany top a dark walnut color to echo the top of the built-in lower dining room cabinets.
Weeks later we were thrilled to find four Duncan Phyfe-style wooden chairs at our local Salvation Army store. They too were painted white and the seats reupholstered with new fabric.
Still not enough seating for our growing family, we built a farmhouse dining bench from a vintage headboard set that we found at Habitat ReStore. It too was painted white and the seat upholstered to match the Duncan-Phyfe chairs.
We are thrilled with our new to us dining room furniture, especially because we spent a fraction of the cost of buying new furniture!
The antique-style mirror hanging above the dining bench is also a DIY project where I made an inexpensive floor-length mirror from Walmart look like an antique.
Listed below are the supplies we used for this affordable DIY dining room makeover. Some contain affiliate links so you can see what products we used or recommend for this project. As an Amazon Associate, I earn a small commission from any qualifying purchases at no extra cost to you. Thank you for your support!
Supply List
Bulls Eye 123 White Primer
White Satin Behr Premium Plus Paint and Primer
Varathane Premium Diamond Coat Finish
Lime Chalk Style Paint
Primer White Spray Paint
White Wax
Thanks for stopping by the Interior Frugalista today! I hope you were inspired by our DIY dining room makeover.
Almost all of our DIY ideas have step-by-step tutorials so why not get your budget DIY on and subscribe. You can also find us on Pinterest, Facebook, Instagram, and YouTube.
If you have any questions, please leave them in the comment section below or the Contact Me tab at the top to drop me an email. I love hearing from you!
If you enjoyed this easy on the pocketbook DIY dining room makeover idea, I'd be so thankful if you shared it with a friend and pinned it to your favorite board on Pinterest.
I share my projects at these inspiring link parties.


It is gorgeous!
ReplyDeleteThank you so much, Debra! It hurt a little painting the wood on the built-in cabinet but I'm so glad we did.
DeleteI love the change to white! I have so much brown furniture and have been slowly painting most of it white! It's so much brighter and I love having the neutral background for seasonal decor! Great job, Donna
ReplyDeleteThank you so much, Donna! It's amazing what a difference going from brown to white makes in a space. I've kept some brown but it's a minimal accent color. You're so right about the white providing a neutral background for seasonal decor!
DeleteWowza, what a transformation! It's so bright and cheerful. There's not one thing I'd change in there. And I don't think you even needed to change out the door fronts. The wall art and bench are fabulous too. I would love spending time in there! Seriously, great job! pinned
ReplyDeleteYou're making me blush, Cindy, thank you for your sweet comments and the pin! It only took us almost twenty years to finally get this room right. 😌
DeleteExcellent post
ReplyDeleteThank you, I'm glad you enjoyed it!
Deletepopping back in to say I loved this so much I'm featuring it on Farmhouse Friday this week. Thanks for linking up and I'm super excited for you! It's just so stinkin' cute!
ReplyDeleteYou made my day, Cindy, thank you so very much for the feature and all your sweet comments! xo
DeleteWow, Marie. I love this! I'm not usually in the camp for painting wood, but this truly looks amazing. So much brighter. Love the board and batten, as well as removing the valance and painting the interior wallpaper of those side display cabinets. Gutsy!
ReplyDeleteThanks Rita, I definitely hesitated a bit with the paintbrush on the cabinetry. I felt a little gutsy going with the lime green interior too, especially considering green is not a color I gravitate towards. But I'm tickled pink with how the color combination makes the room feel so fresh and bright.
Delete